

Halloween Special Grow Kit
This Halloween Special will stay available until 1st November!
Halloween Special Grow Kit
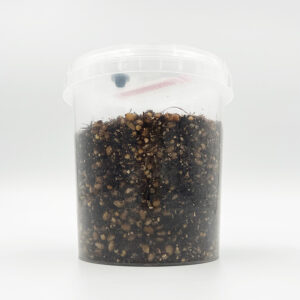
Our Halloween Special Grow Kit is a simple, all-in-one mushroom grow kit.
To use: Inject with 3ml of solution, place in a warm area until it’s fully colonised with white mycelium, then remove the lid and place the tub inside the included tent to fruit your mushrooms!
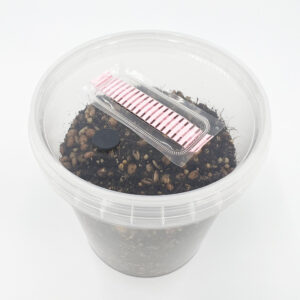
- 1L Injectable Tub prefilled 2/3rds with Sterile Cylocybe Special substrate
- Fruiting: Pop the lid off after colonisation and pop into the included tent
- Sanitation: 2× isopropyl alcohol wipes, 1× hand wipe, 1x 18G sterile needle
- Online Instructions (coming in the next day or two)
Important Warnings
The specialised filters on the tub is for clean air exchange – please don’t remove them.
NEVER open before it’s fully colonised by mycelium, or contamination may ruin the kit.
Not Included
- Gourmet spore or liquid culture syringe – you’ll need exactly 3ml.
Storage Tips
We recommend inoculating within 4 weeks of receiving it for the best results.
Helpful Advice
- Keep incubation temperatures between 20°C and 26°C for optimal growth.
- Never place this kit on direct heat, like a heatmat.
- Always follow the included instructions carefully.
Shipping & Legal Notes
We ship from the UK to almost anywhere in the world. Each kit is made fresh to order and typically dispatched within our 3 working day aim (see our shipping and dispatch page for more info).
This product is for cultivating legal mushroom species only
Grow Guide for Halloween Special Grow Kit
1. Inoculation of Halloween Special
Perform inoculation in a small, clean, draft-free area (a Still-Air Box is recommended) to minimise contamination risk.
Ensure personal cleanliness: shower, wear clean clothing, and use the supplied face mask and wipes to sanitise hands and forearms. For maximum efficacy, use each wipe with deliberate friction for 40–60 seconds.
Prepare your gourmet mushroom spore/culture syringe and attach a sterile needle. Immediately before inoculating, disinfect the grey rubber injection port with a green Clinell wipe for 40–60 seconds. Pierce the cleaned port and inject 3ml, aiming the needle toward the inner side wall of the tub so mycelium will colonise there and be visible sooner; do not disturb the lid or its air-exchange filter.
- Sanitise: Wipe hands and forearms with the blue Clinell wipe for 40–60 seconds (use each wipe once).
- Prepare syringe: Attach a new sterile needle to the syringe.
- Disinfect port: Clean the grey rubber injection port on the lid with a green Clinell wipe for 40–60 seconds immediately before injection.
- Protect filter: Do not touch the pink filter strip on the lid; it provides clean air exchange and must be kept clean.
- Inject: Pierce the disinfected grey port, aim toward the inner side wall of the tub so mycelium will colonise there and be visible sooner, then inject 3ml.
Inoculation Tips:
- Keep the tub in its packaging until ready to use.
- Keep the lid on until the substrate is fully colonised; removing it risks contamination. The tape around the rim reduces contamination risk and serves as a reminder to not take the lid off too soon.
- After inoculation, minimise handling to avoid contamination.
2. Colonisation of Halloween Special
After inoculation, leave the tub undisturbed in a warm location to allow mycelium to colonise. Most common species grow well between 20–26°C; growth accelerates toward 26°C but contamination risk increases. We recommend 22–24°C as the best balance of speed and safety. Mycelial signs can appear in days at optimal temps, but sometimes take longer — patience is essential.
Colonisation Temperatures
Temperature strongly affects colonisation. Use the table below as a guideline.
| Method | Ideal Temp | Expected Time |
|---|---|---|
| Spore syringe | 24–26°C (75–79°F) | 2–4 weeks |
| AC / LC / G2G | 24–26°C (75–79°F) | 7–10 days |
Universal rules
- Ventilation: Do not incubate the tub in an airtight container — mycelium needs to breathe.
- Temperature range: Avoid extremes — below 20°C slows growth; above 26°C raises contamination risk.
- Stability: Maintain a consistent temperature; avoid frequent fluctuations.
- Incubation options: If room temperature is unreliable, use or build a small incubator (more stable and efficient than constant room heating).
Important: Using a heat mat is like trying to hatch an egg on a frying pan. It creates an environment that’s too hot and uneven, drying out the base of the grow kit while sending moisture upwards. This leads to soggy conditions and bacterial growth. For optimal results, create a stable, warm environment instead. Build or buy an incubator or put a radiator inside a small cupboard or just incubate at room temperature (slower colonisation is better than growing a bag of microbes).
3. Fruiting your Mushrooms!
Stage three moves from mycelium to fruiting.
3.1. Dunking for Humidity and Hydration
Once the substrate is fully colonised (covered in white mycelium), perform a 'dunk' to rehydrate the cake and give a cold shock that encourages pinning.
Simple method: pour clean water into the Halloween Special tub, place the lid on, and weigh the cake down so it stays submerged (a rolled foil ball wedged between lid and cake works). Keep submerged for 12–24 hours — longer dunking (up to 24 hours) usually yields better results.
Dunking troubleshooting
- Only dunk fully colonised cakes — if it smells off, do not dunk.
- Ensure the cake stays completely submerged for the whole dunk period.
- Longer dunk times generally improve hydration and yield.
After dunking, drain and rinse the cake with clean tap or spring water, then drain thoroughly to avoid pooled water.
3.2. Using Your Grow Tent
There are multiple ways we can go about this; like taking the mycelium cake out of it's plastic tub and sitting it at the bottom of the grow bag... but our preferred option is to fruit directly inside the plastic tub itself.
One of the ways we've got excellent results is to place the lid on the Halloween Special a bit squint, like you do with a pot of soup to vent. That keeps in a lot of humidity at the same time as allowing a decent amount of (not too much) fresh air exchange, then sitting inside the grow tent.
Try to maintain a temperature of around 21°C (give or take a couple of degrees). Humidity will naturally build up inside the Halloween Special and grow tent from the water you allowed to soak into the Halloween Special during dunking.
While true that you can get best results from your grow if you fan and mist multiple times a day, the only time you ever really need to open your grow bag after the onset of pins is when you're ready to harvest your fully grown mushrooms. Even peeking for a few seconds could be enough to lose some humidity if you aren't careful, which can sometimes cause growth defects.
3.3. Humidity and Air Exchange
Humidity and FAE (fresh air exchange) are extremely important for pinning and healthy mushroom development, as is temperature and light. They all need to work in harmony.
We suggest cutting a 1cm slit through both sides of the tent near the top and placing an electric fan somewhere in the room on a low setting (but don't go out buying one if you don't already have one). Even opening a window from time to time can be great for creating some air currents which will help increase the FAE inside the grow tent.
3.4. Light and Environmental Conditions
Your mushrooms will need light to grow. We recommend indirect sunlight or a 5000-6500K LED or fluorescent light a few feet away - if the light is heating the substrate, move it further away.
If you notice the inside of your bag looking dry, it may be due to the fan being too close, the holes you cut being too big, or grow lights (if using them) being too close and hot. Observe what's happening and adjust your setup as required. Fantastic results depend on it.
3.5. Pinning and Growth
After around 3-7 days, you'll hopefully begin to see lots of tiny white dots. These are hyphal knots that will develop into primordia, aka mushroom pins. It will take 4-5 days for them to grow into fully mature mushrooms ready for harvest.
During this time, they'll let you know if something isn't quite right. Fuzzy mycelium at the base of the mushrooms and/or thin stems are an indication that more FAE is needed. Increasing the fan speed or length of the cuts on the tent or bag might be something to try.
Don't worry about any mushrooms growing around the sides and bottom of the cake. You'll still be able to harvest them. If you want to give your mushrooms more room to grow next time, consider using a fruiting chamber instead of the bag?
Fruiting Troubleshooting Tips:
- Water pooling: If you see pools of water touching the substrate, dab them with a paper towel. Standing water can eventually become contaminated.
- Temperature issues: Maintain stable temperature between 18-24°C. Unstable temps can lead to excessive condensation.
- Fuzzy stems: This indicates insufficient fresh air exchange (FAE). Try increasing airflow slightly.
- Dry substrate: Only mist if the substrate looks dry; otherwise, humidity should come from the substrate itself.
- Aborted pins: Often caused by environmental changes. Maintain consistent conditions.
3.6. Harvesting and Subsequent Flushes
When the veil beneath one of your mushroom caps is about to tear off, this is a good time to consider harvesting your first flush - but you can totally leave it longer and for the mushrooms to fully open up (it's just that the caps will rain down spores and make a bit of a mess!).
After each flush, repeat the dunking process. If you've taken good care of your grow kit, you should achieve multiple flushes of beautiful mushrooms before the nutrients are all used up.
Happy shroomin' folks!