


SporeKit™ Syringe
Gourmet spore syringe producers cannot test every syringe they sell. If they claim otherwise, they’re full of it.
SporeKit only costs a few pounds and gives you the means to verify your own spores yourself before risking a kit.
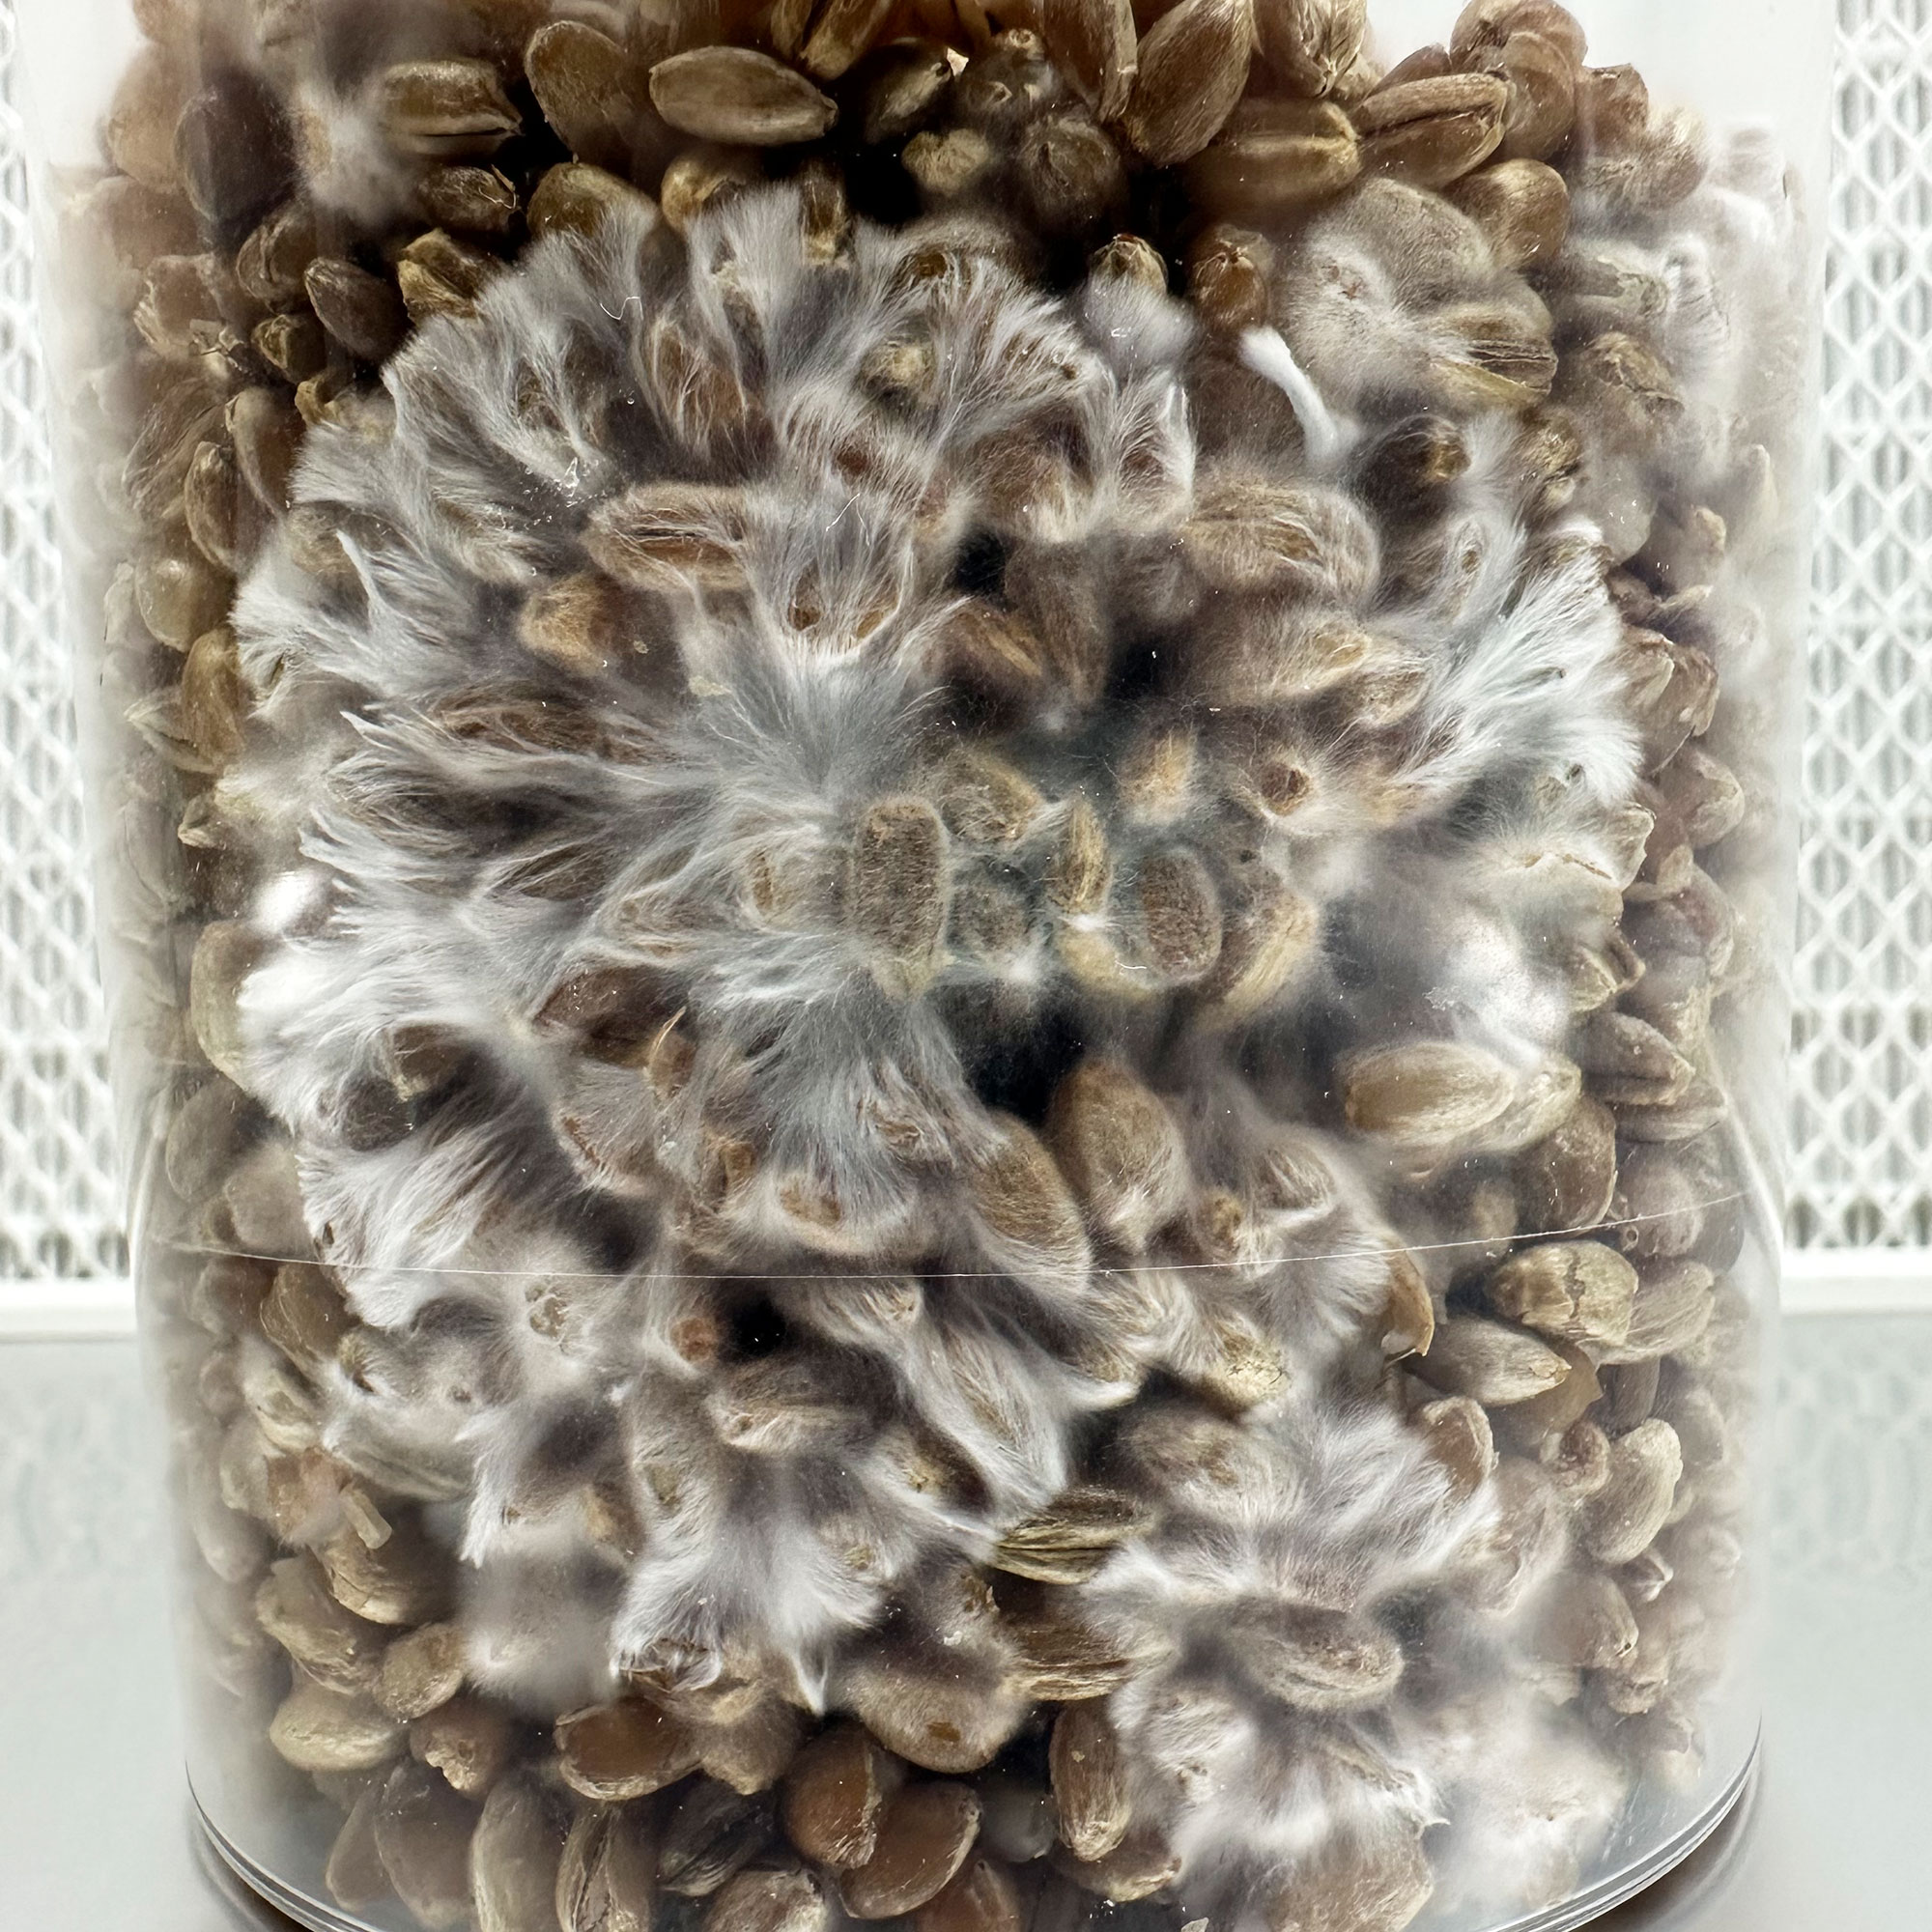
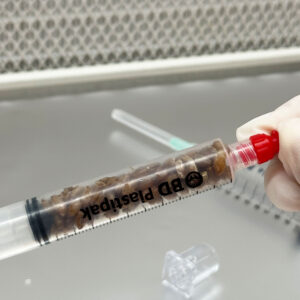
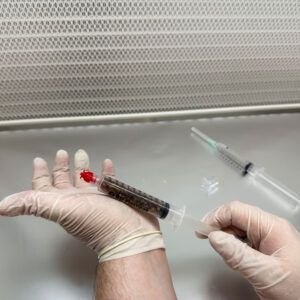
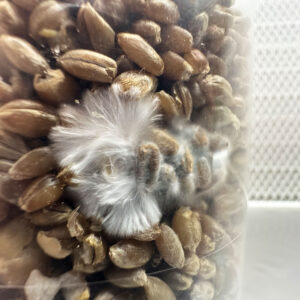
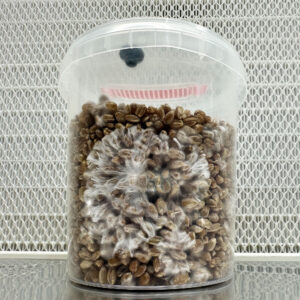
Successful tests will even double as live culture syringes (look closely at the picture and you will see mycelium from a successful test then being used to inject a grow kit!).
Meaning the time taken for the test itself isn’t lost, it’s gained. You can end up with a new kind of culture syringe, which you KNOW is clean and use it to safely inject into a grow kit with a level of confidence you cannot get from spore syringes. Pretty cool, eh?
SporeKit™ is an innovative product born right here at Cylocybe – and we’re bloody proud of it 🙂
Please select options to see availability.
SporeKit™ Testing Kits – for Gourmet Spore Syringes, Prints and Swabs
Check the cleanliness of your spore syringe or swab before you commit it to a grow kit. SporeKit saves time, money, and frustration by helping you spot issues early – and, in all cases, turns the test into a usable, new kind of culture syringe which can inoculate most kinds of grow kits.
All kit syringes are produced by us in front of ISO4 laminar flow using expert sterile technique (if we do say so!) and then bagged so even the outside surfaces of the syringe is as clean as humanly possible. That means you can remove plungers to access agar or grain and inoculate however you prefer – your success will come down to your own technique, not dust or microbes being cross-contaminated at no fault of your own because of a dirty syringe (we do know what we’re doing and we do respect the art of sterile technique). Treat your test syringes with the same respect, especially if removing the plunger or cutting a grain syringe for the G2G method.
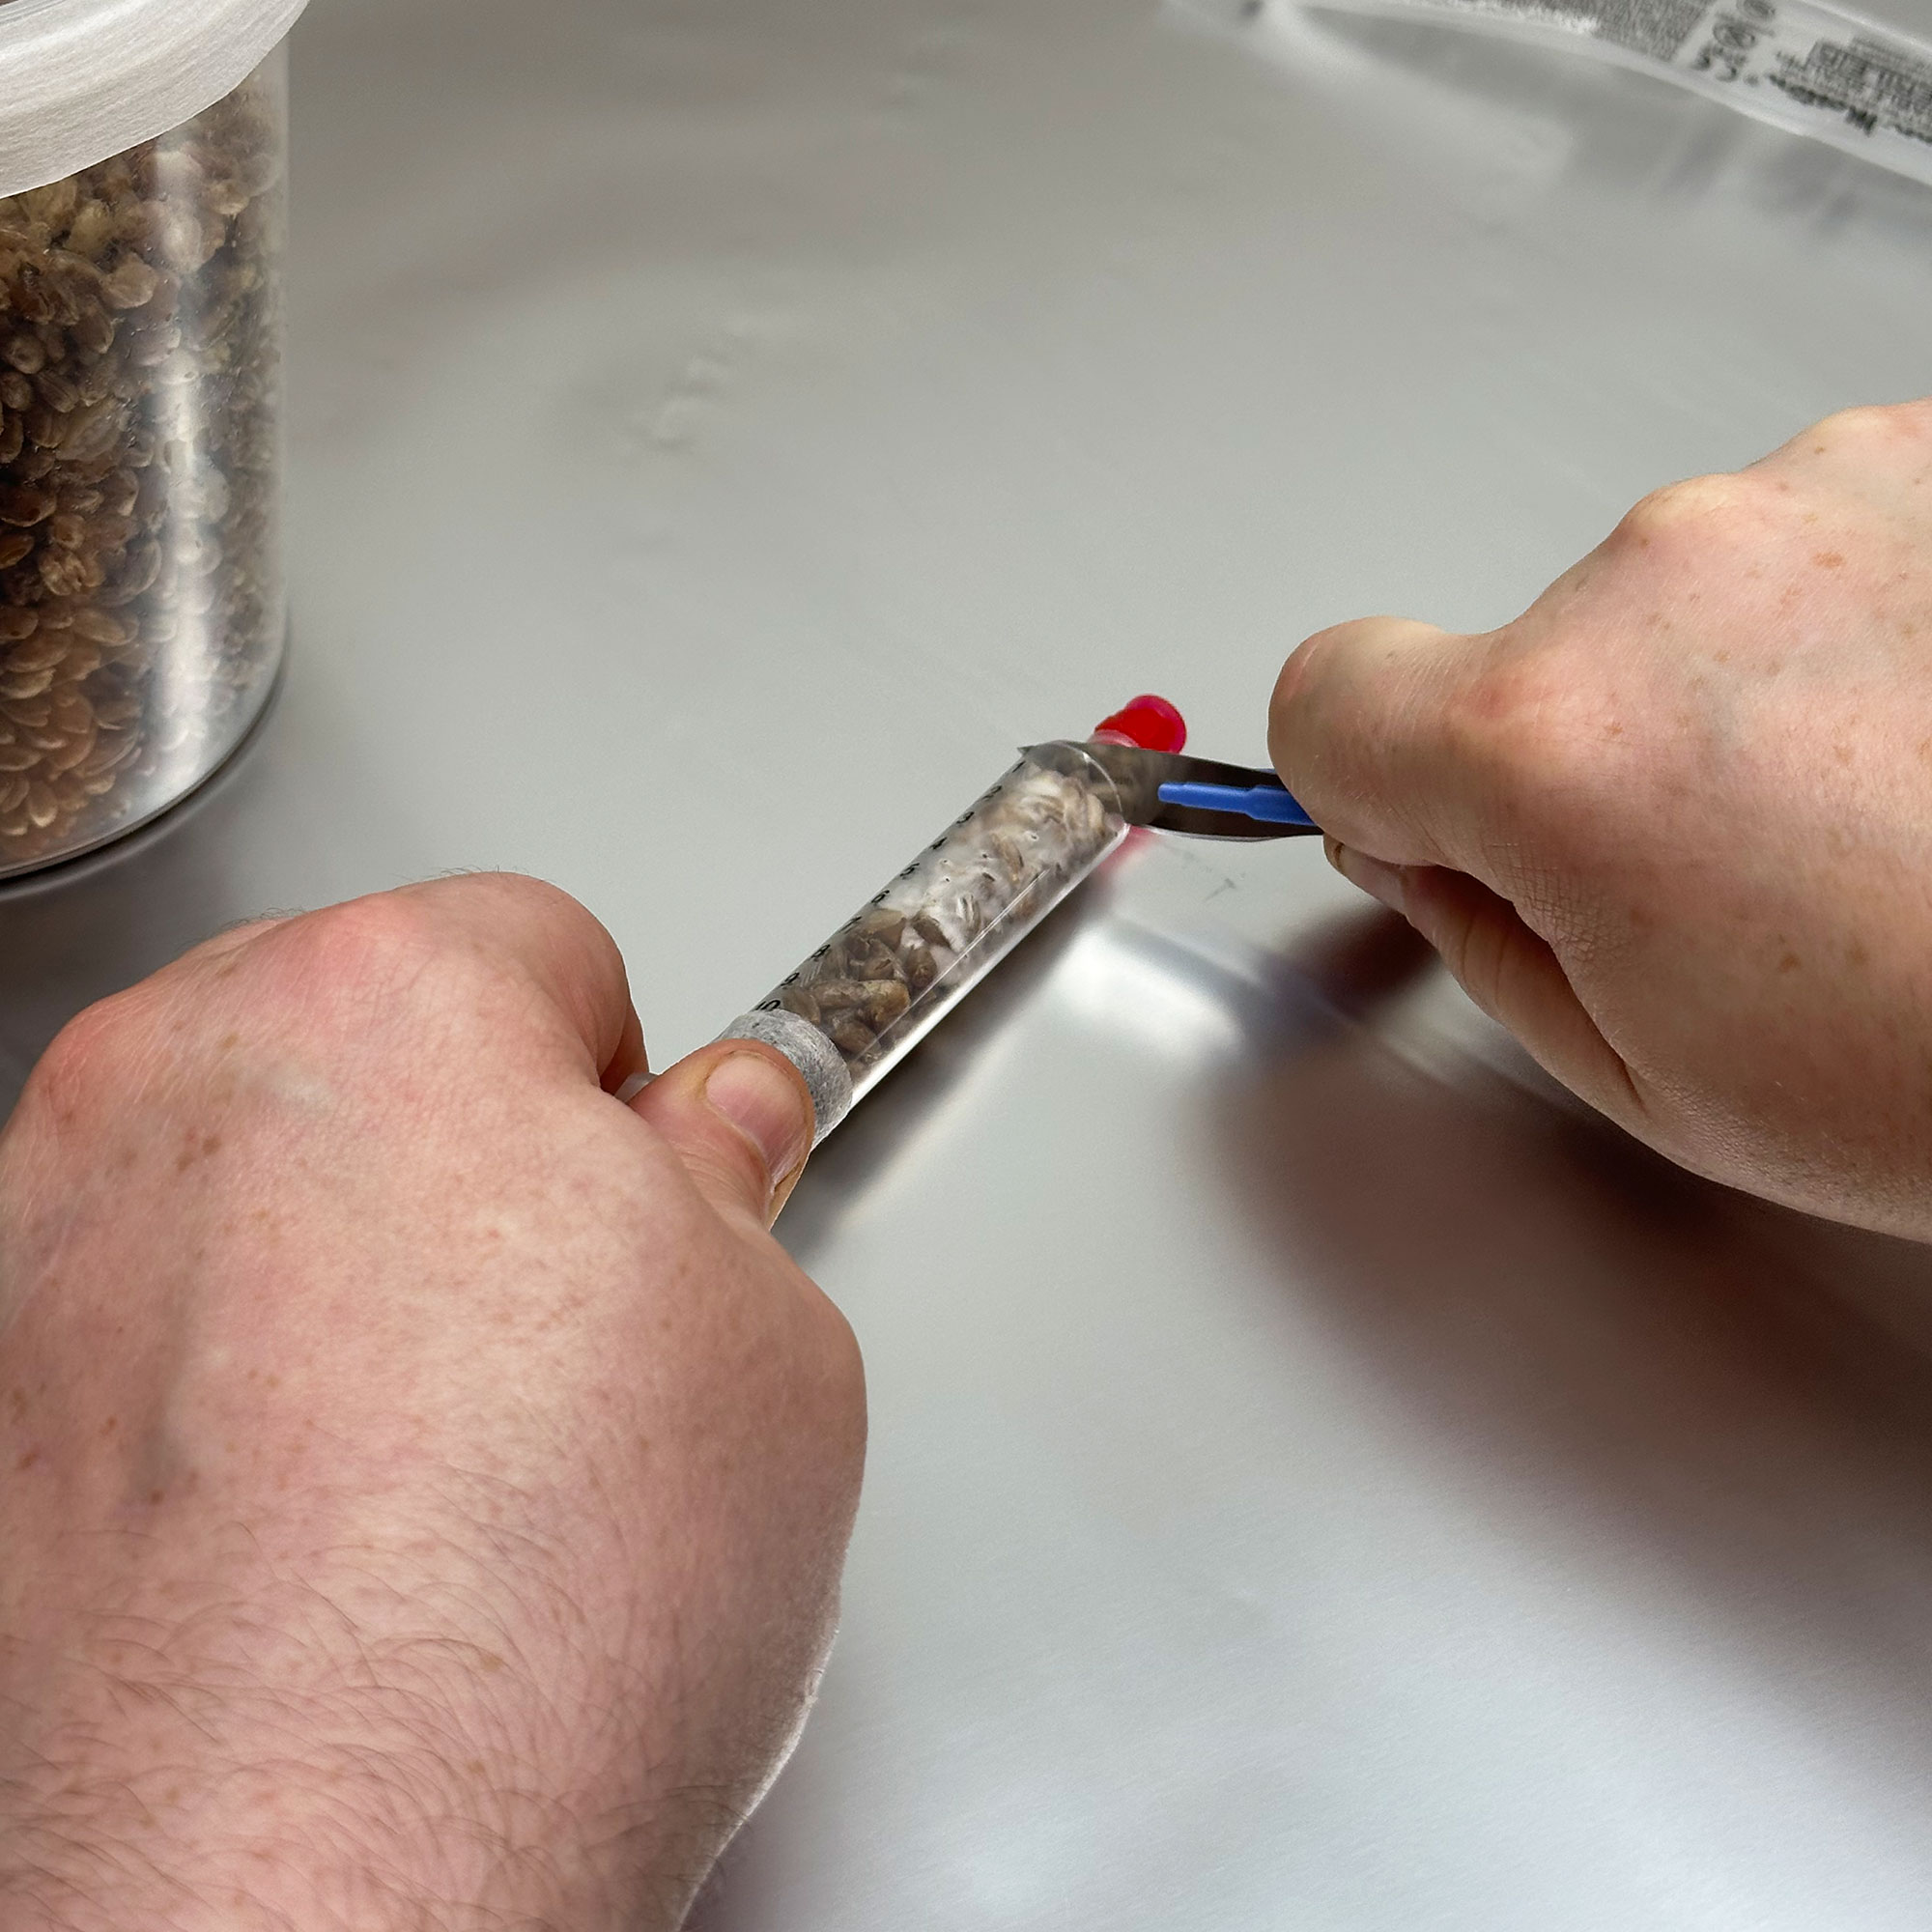
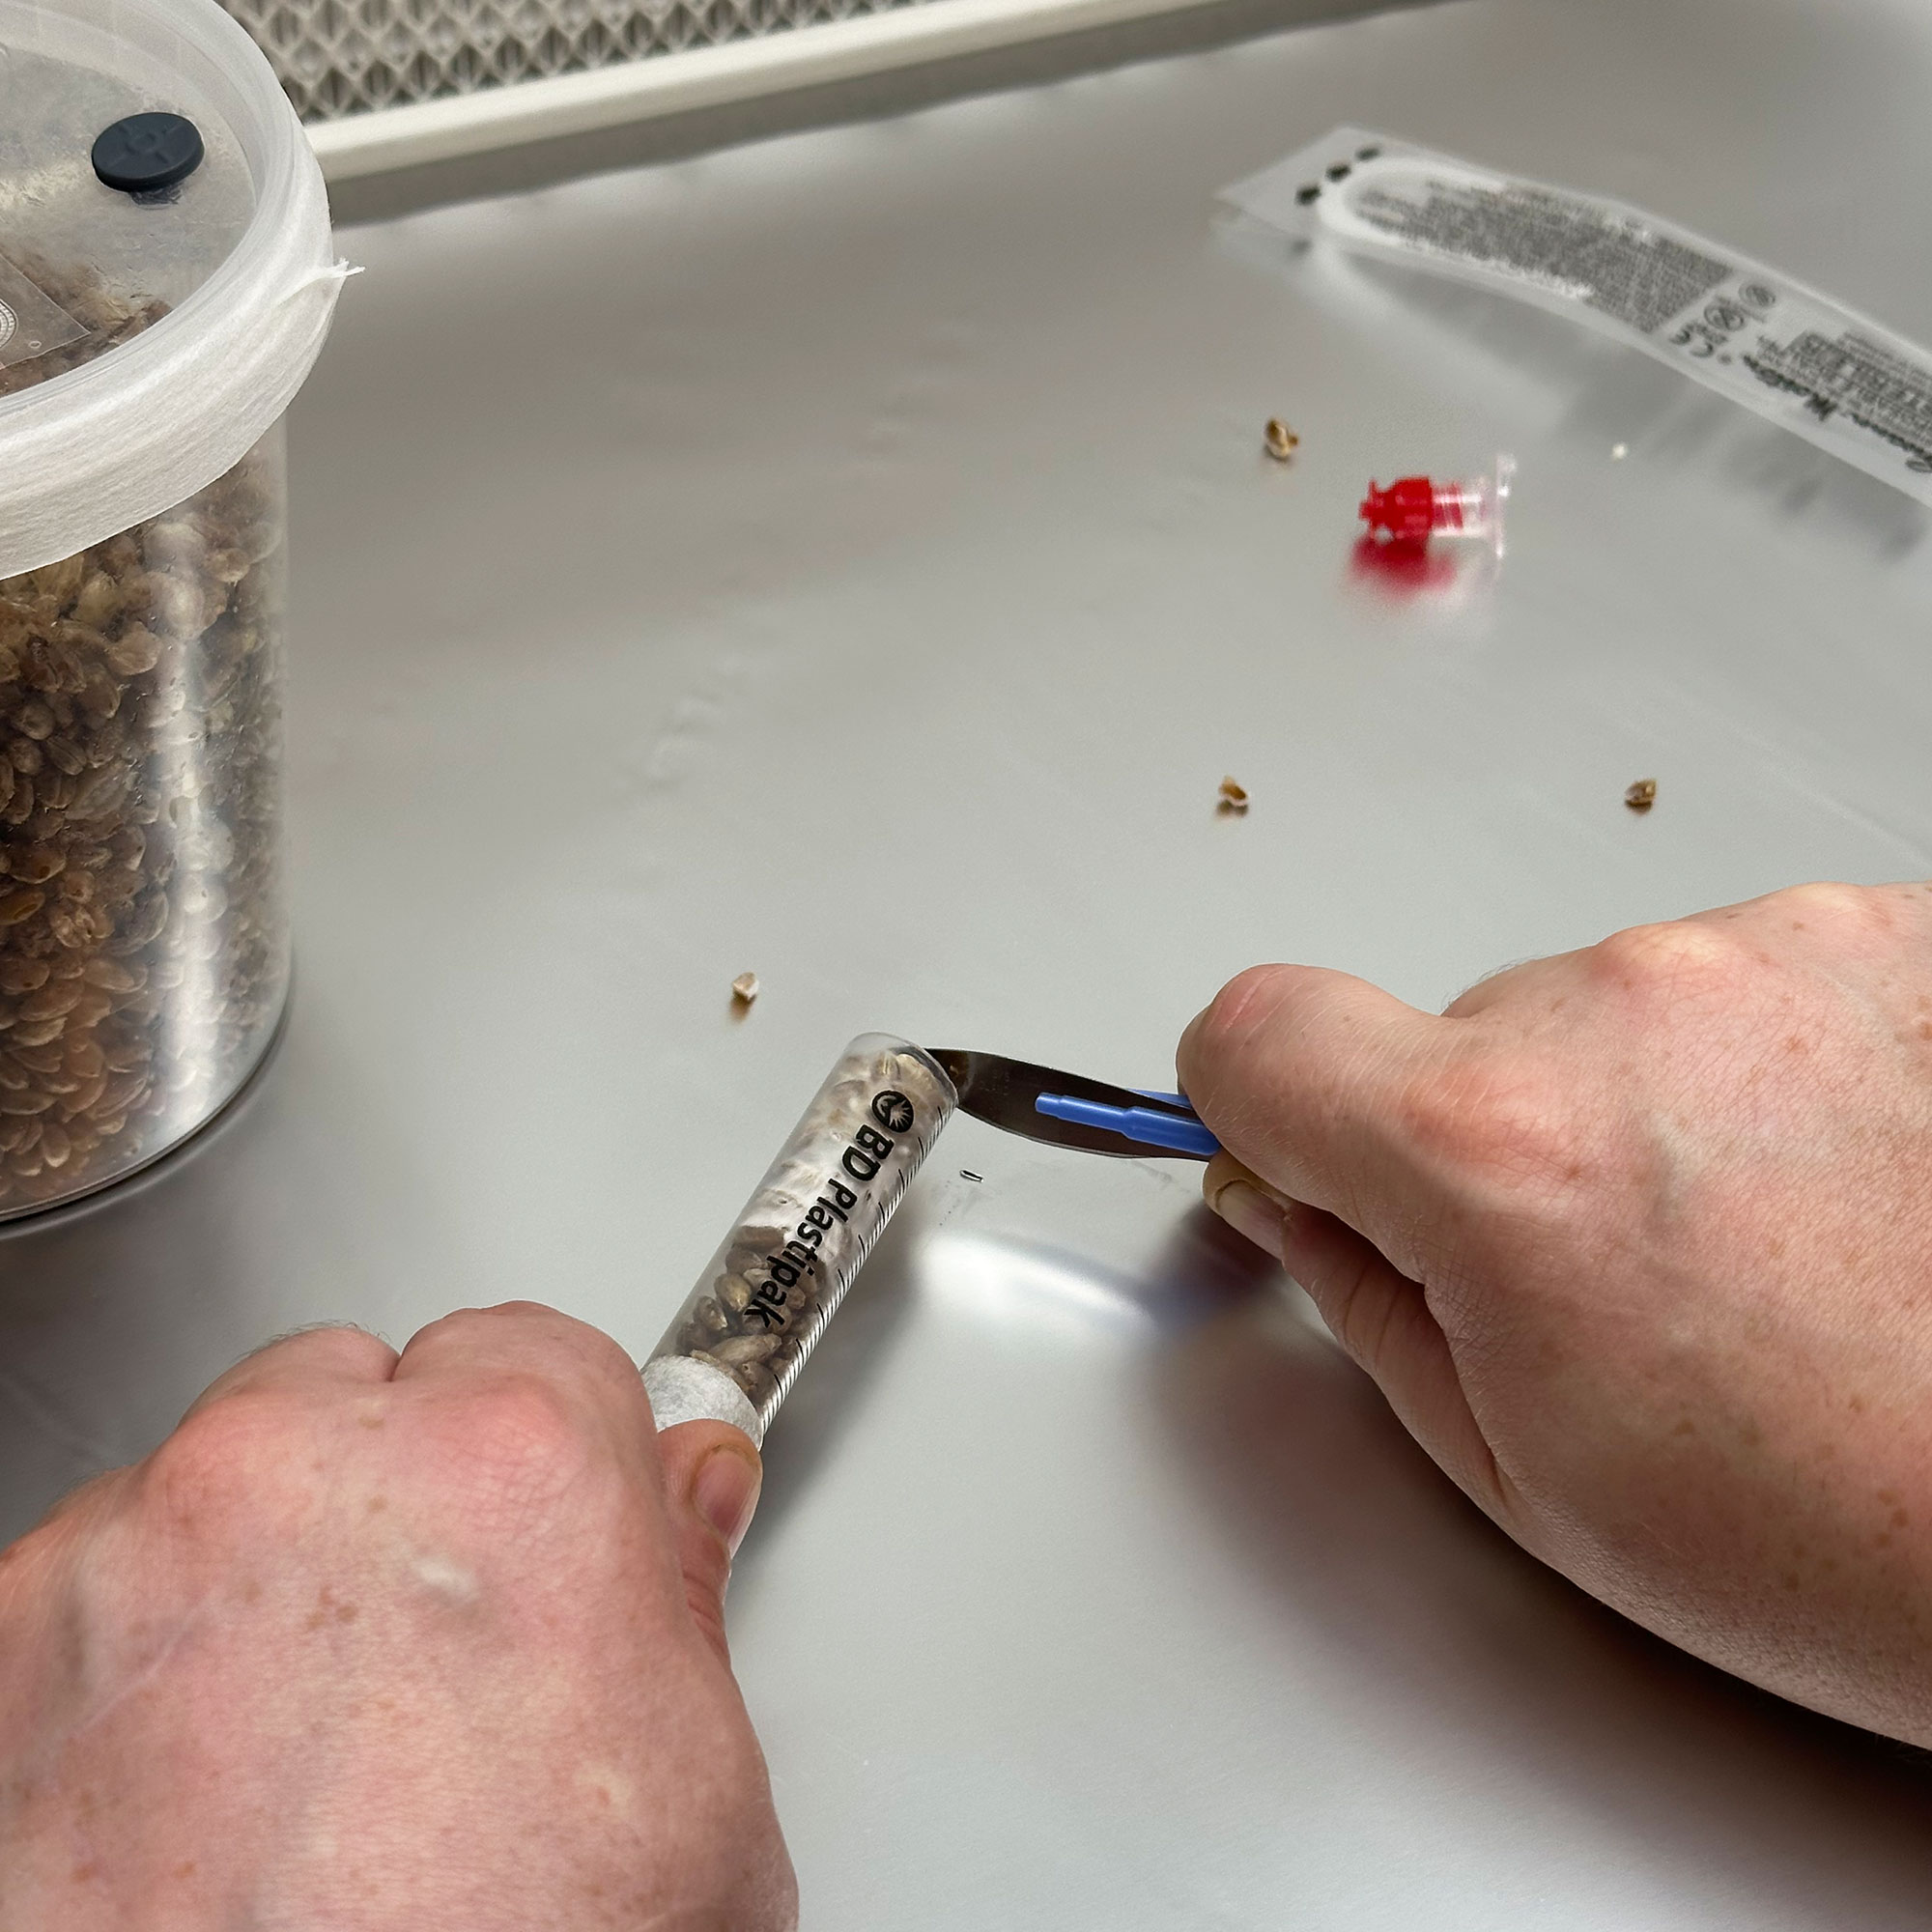
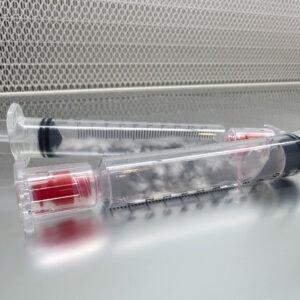
In the pictures, you’ll see ungloved hands cutting the grain syringe open and inoculating a SpawnTub with it (because not every customer is going to be using gloves..!). Never attempt this outside of a still-air box (unless you have a flow hood, of course), it’s just too risky.
Available variants
- Grain: Ideal for wet testing, like spore syringes.
- Grain Deluxe: Three grain tests plus tools; can be used as G2G syringes to inoculate SpawnTubs and grow bags.
- Agar: Ideal for dry testing, like spore prints and swabs; can become a usable culture syringe for inoculation.
- Agar Deluxe: Create up to four agar test syringes and turn them into living culture syringes.
Quick comparison – which to pick?
- Grain = best for liquid spore syringes
- Agar = best for spore prints and swabs
- Deluxe kits = multiple tests + easy conversion into multiple culture syringes
Although Grain and Agar may be better suited for wet or dry testing (respectively), it does not mean you can’t test spore sryinges on agar or test spore swabs in grain… Each method can work just fine. The important part is that SporeKit can help acheive ultimate success rates – you can actually see healthy mycelium before inoculating your kit – giving you confidence far beyond what any gourmet spore syringe could provide.
What’s included
All syringes are 12ml luer-lock. Each syringe comes with its own alcohol wipe.
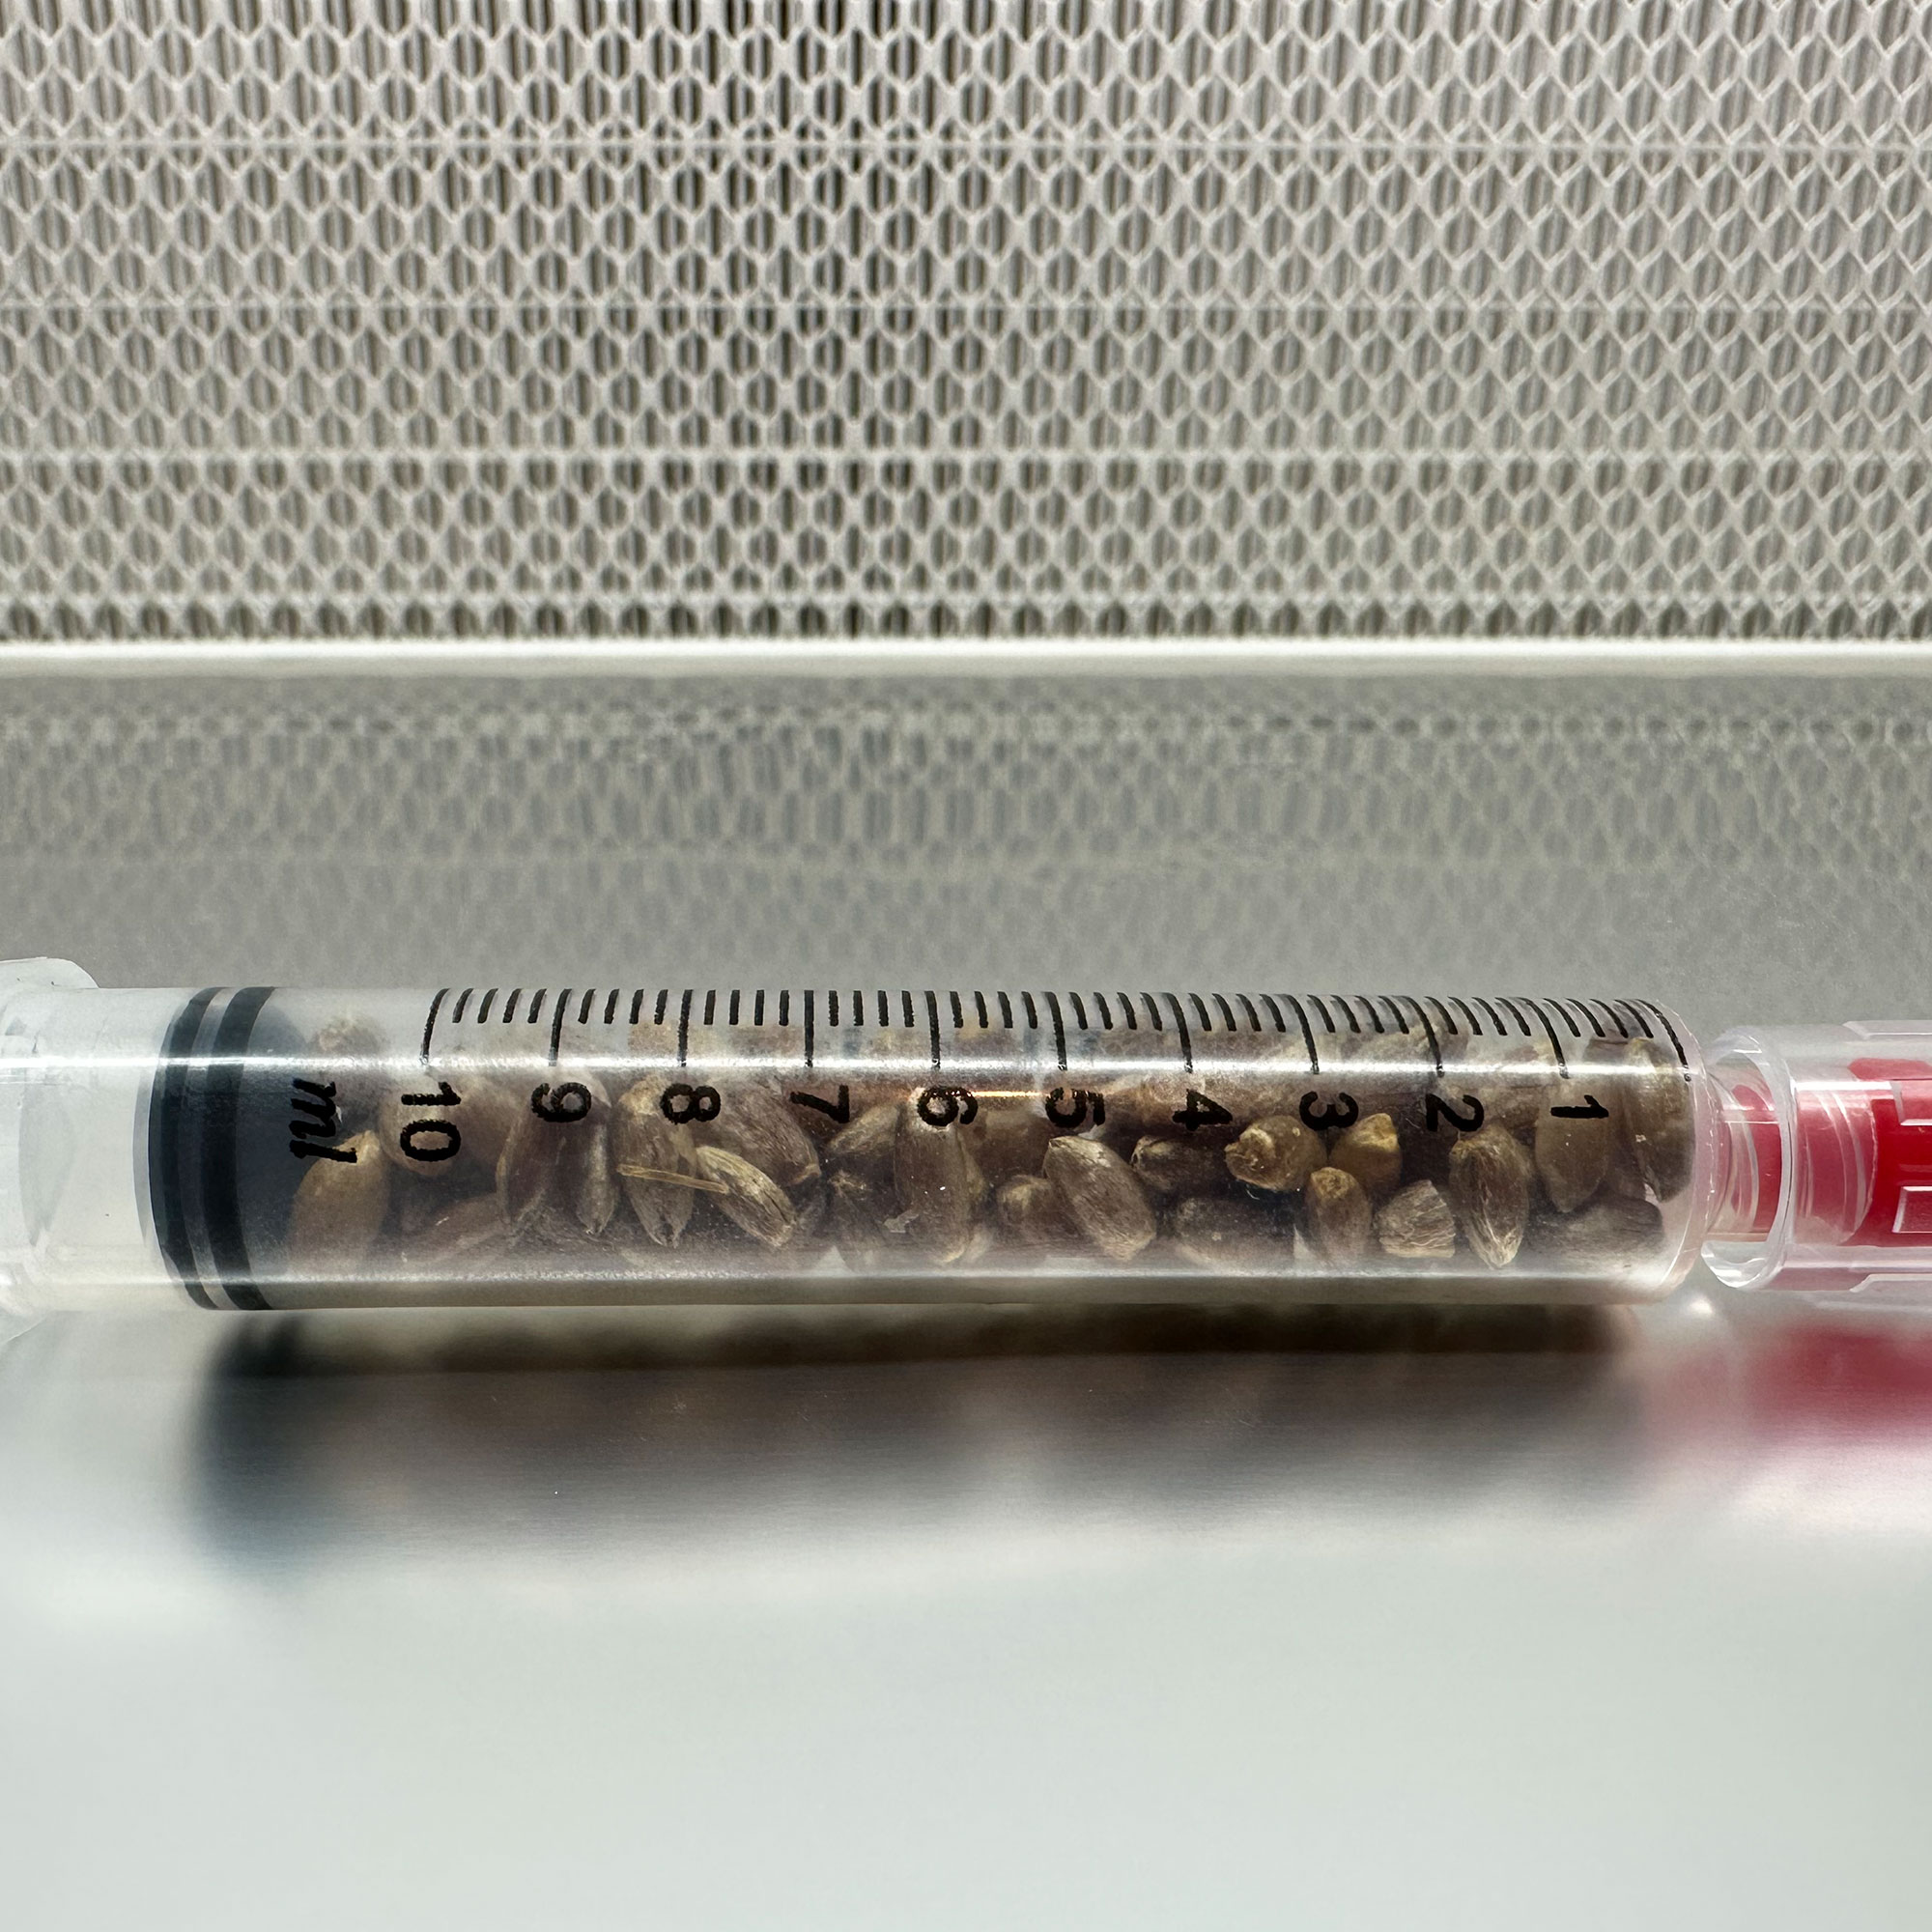
Grain (single test)
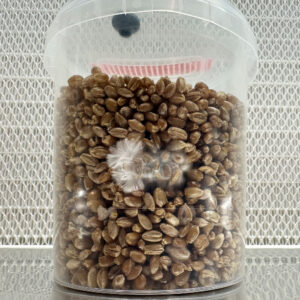
This basic grain testing syringe may not come with a filtered air-hole drilled into the syringe, meaning the mycelium will eventually stall (or stop growing) after it takes up all the available air within the syringe – i.e. some of the grain may not colonise fully. This is not a problem however, as there will be plenty of mycelium growth to establish whether the gourmet spores were clean.
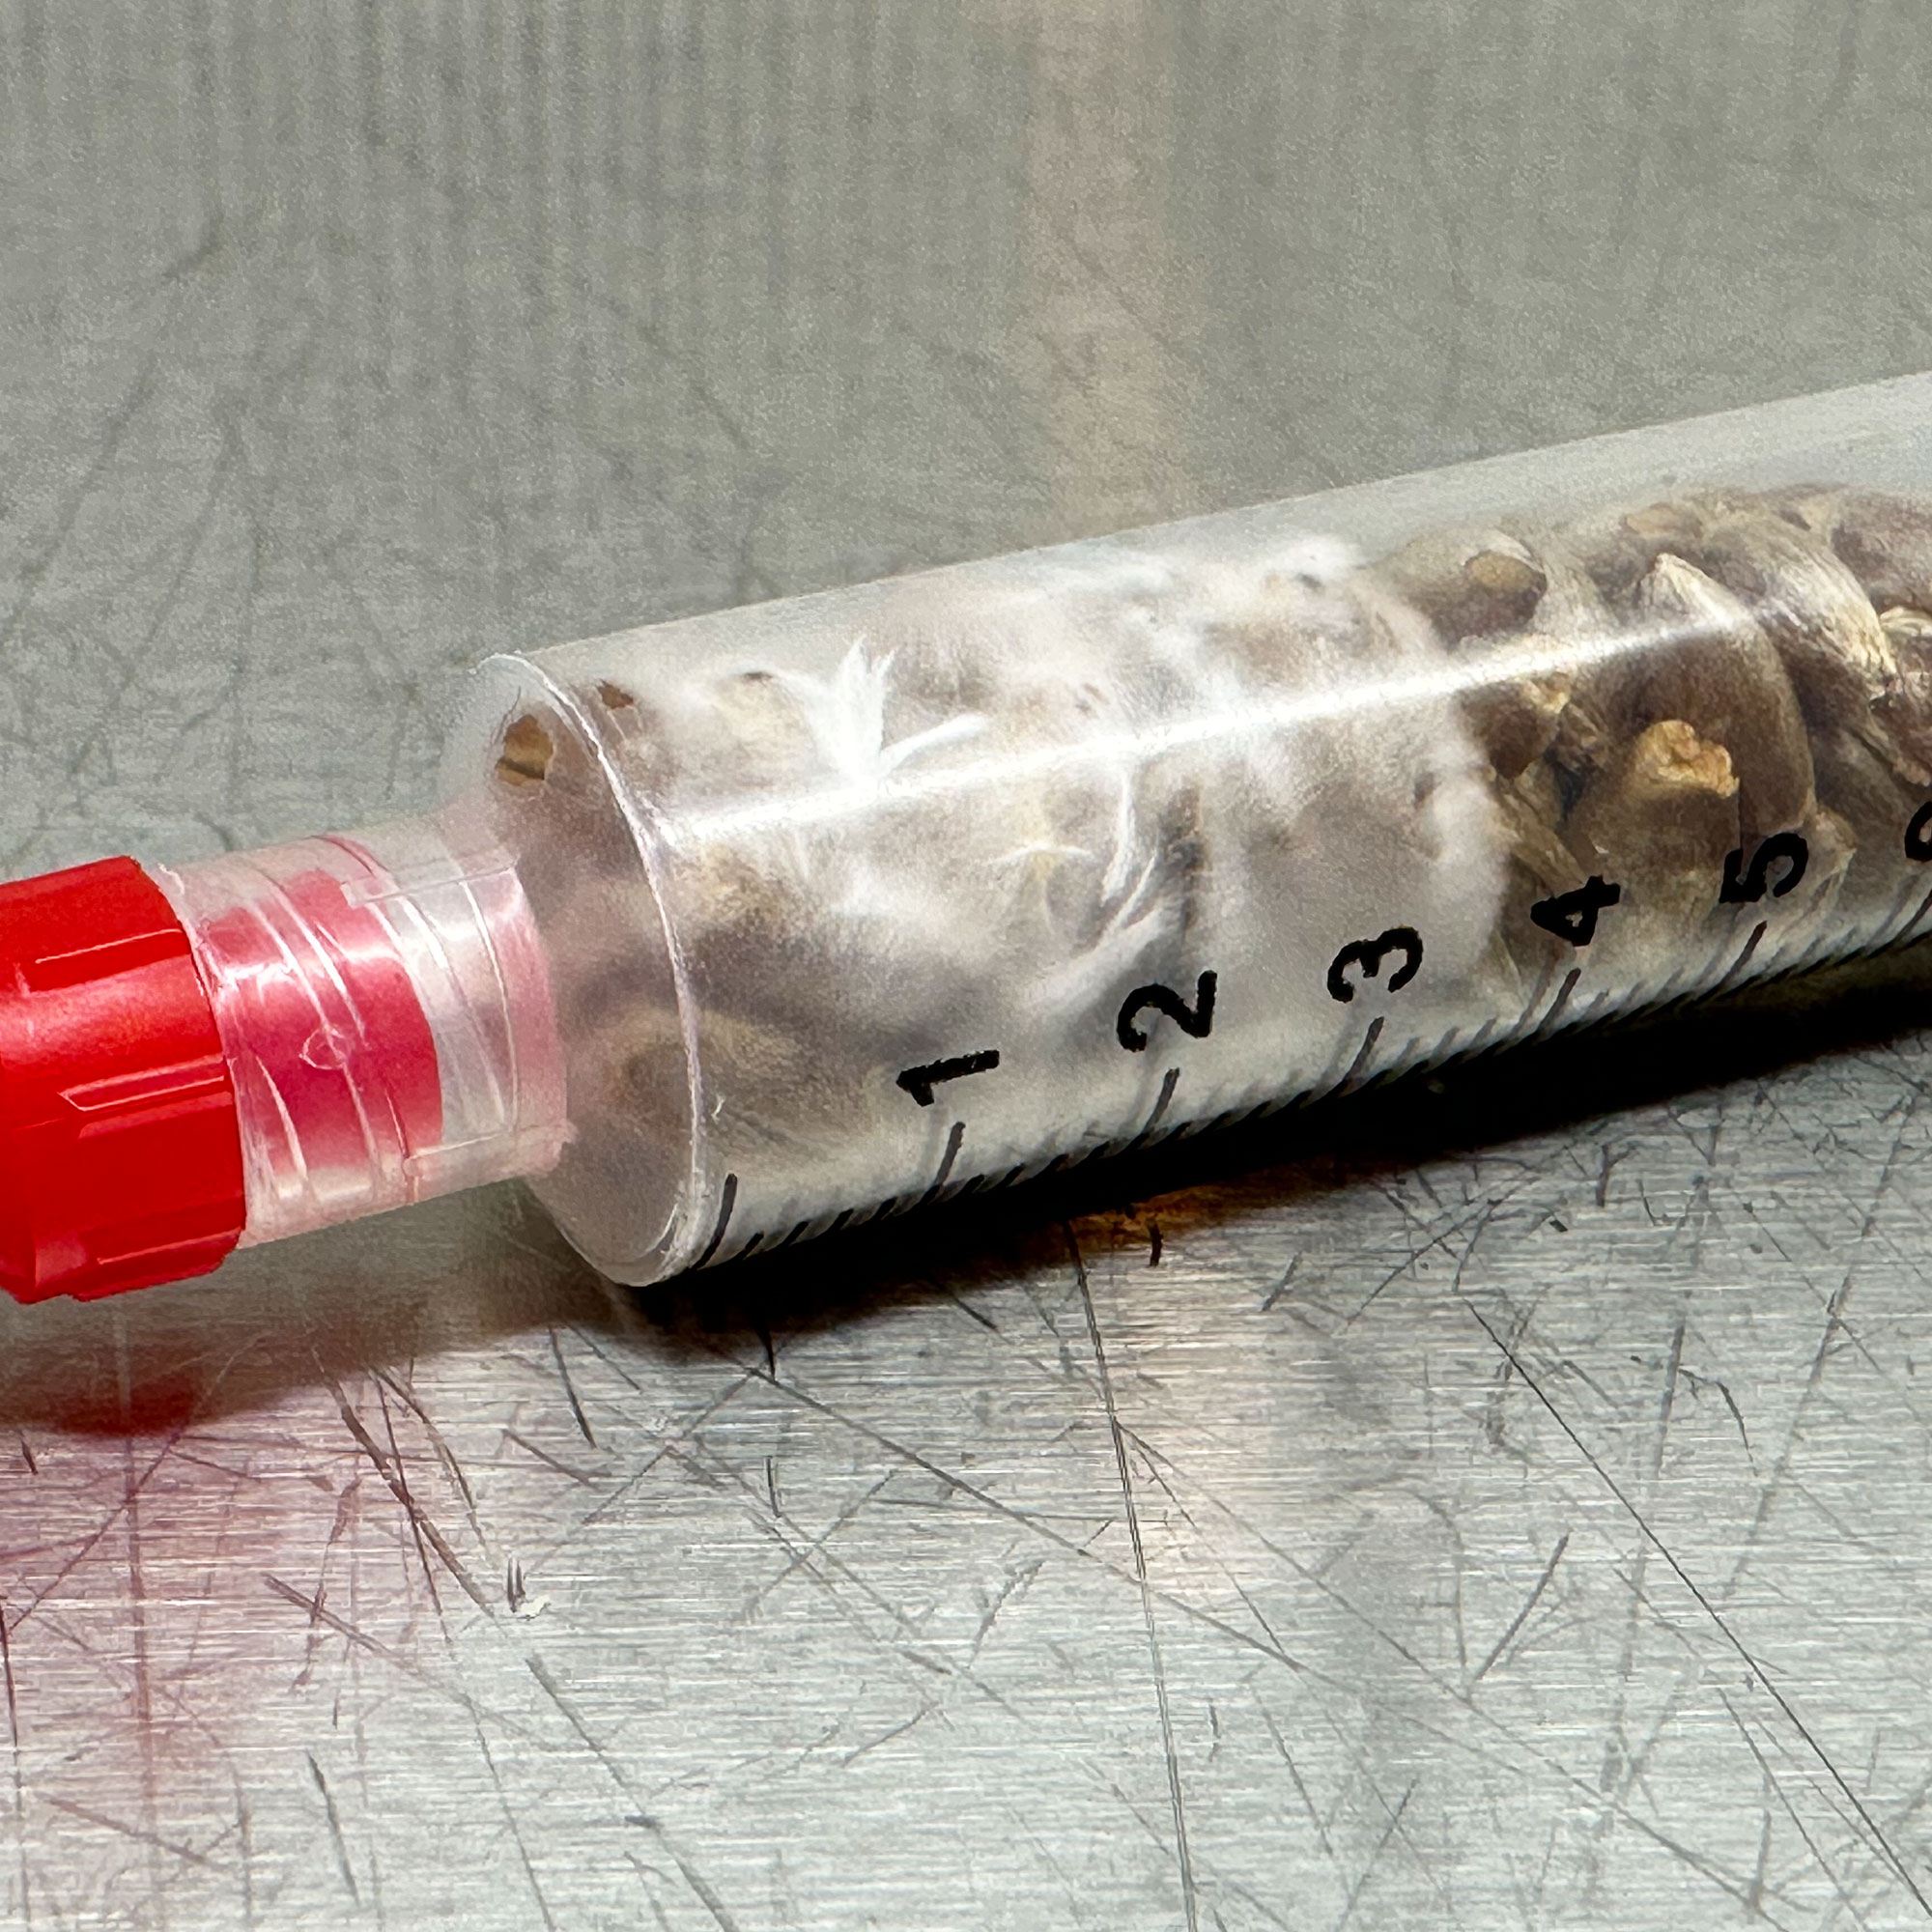
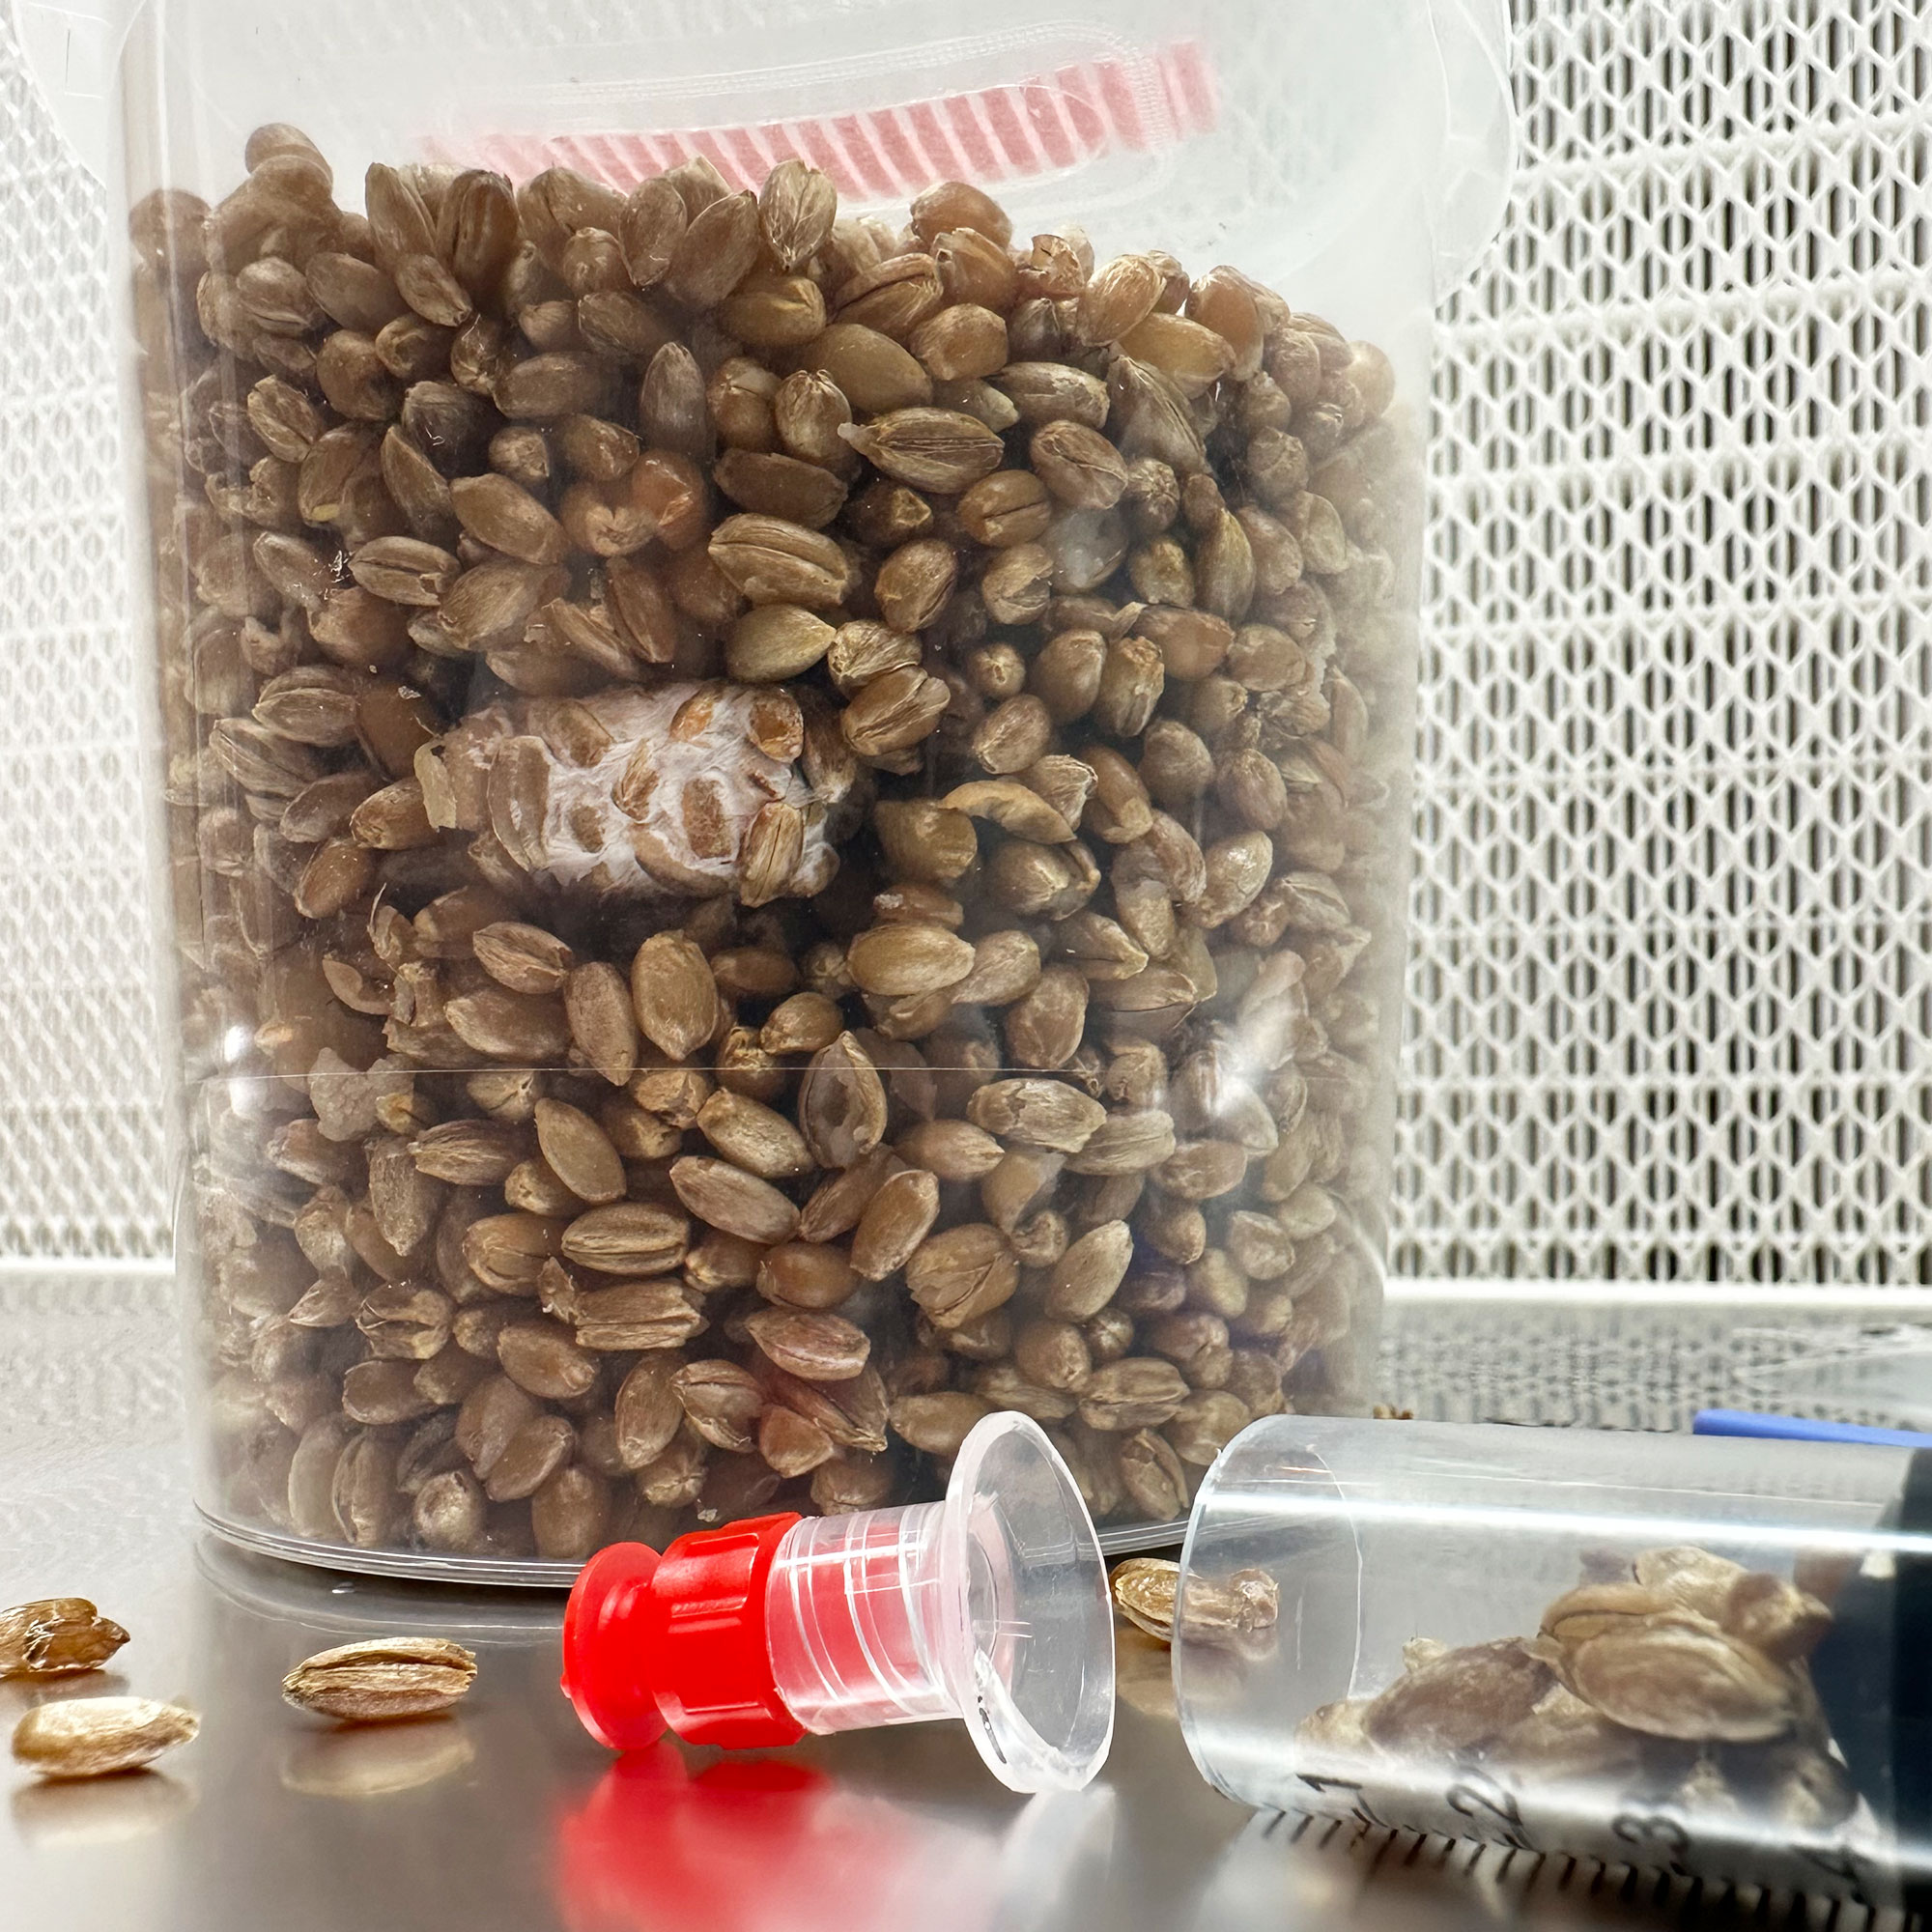
- 1x 12ml syringe pre-filled with sterile hydrated grain
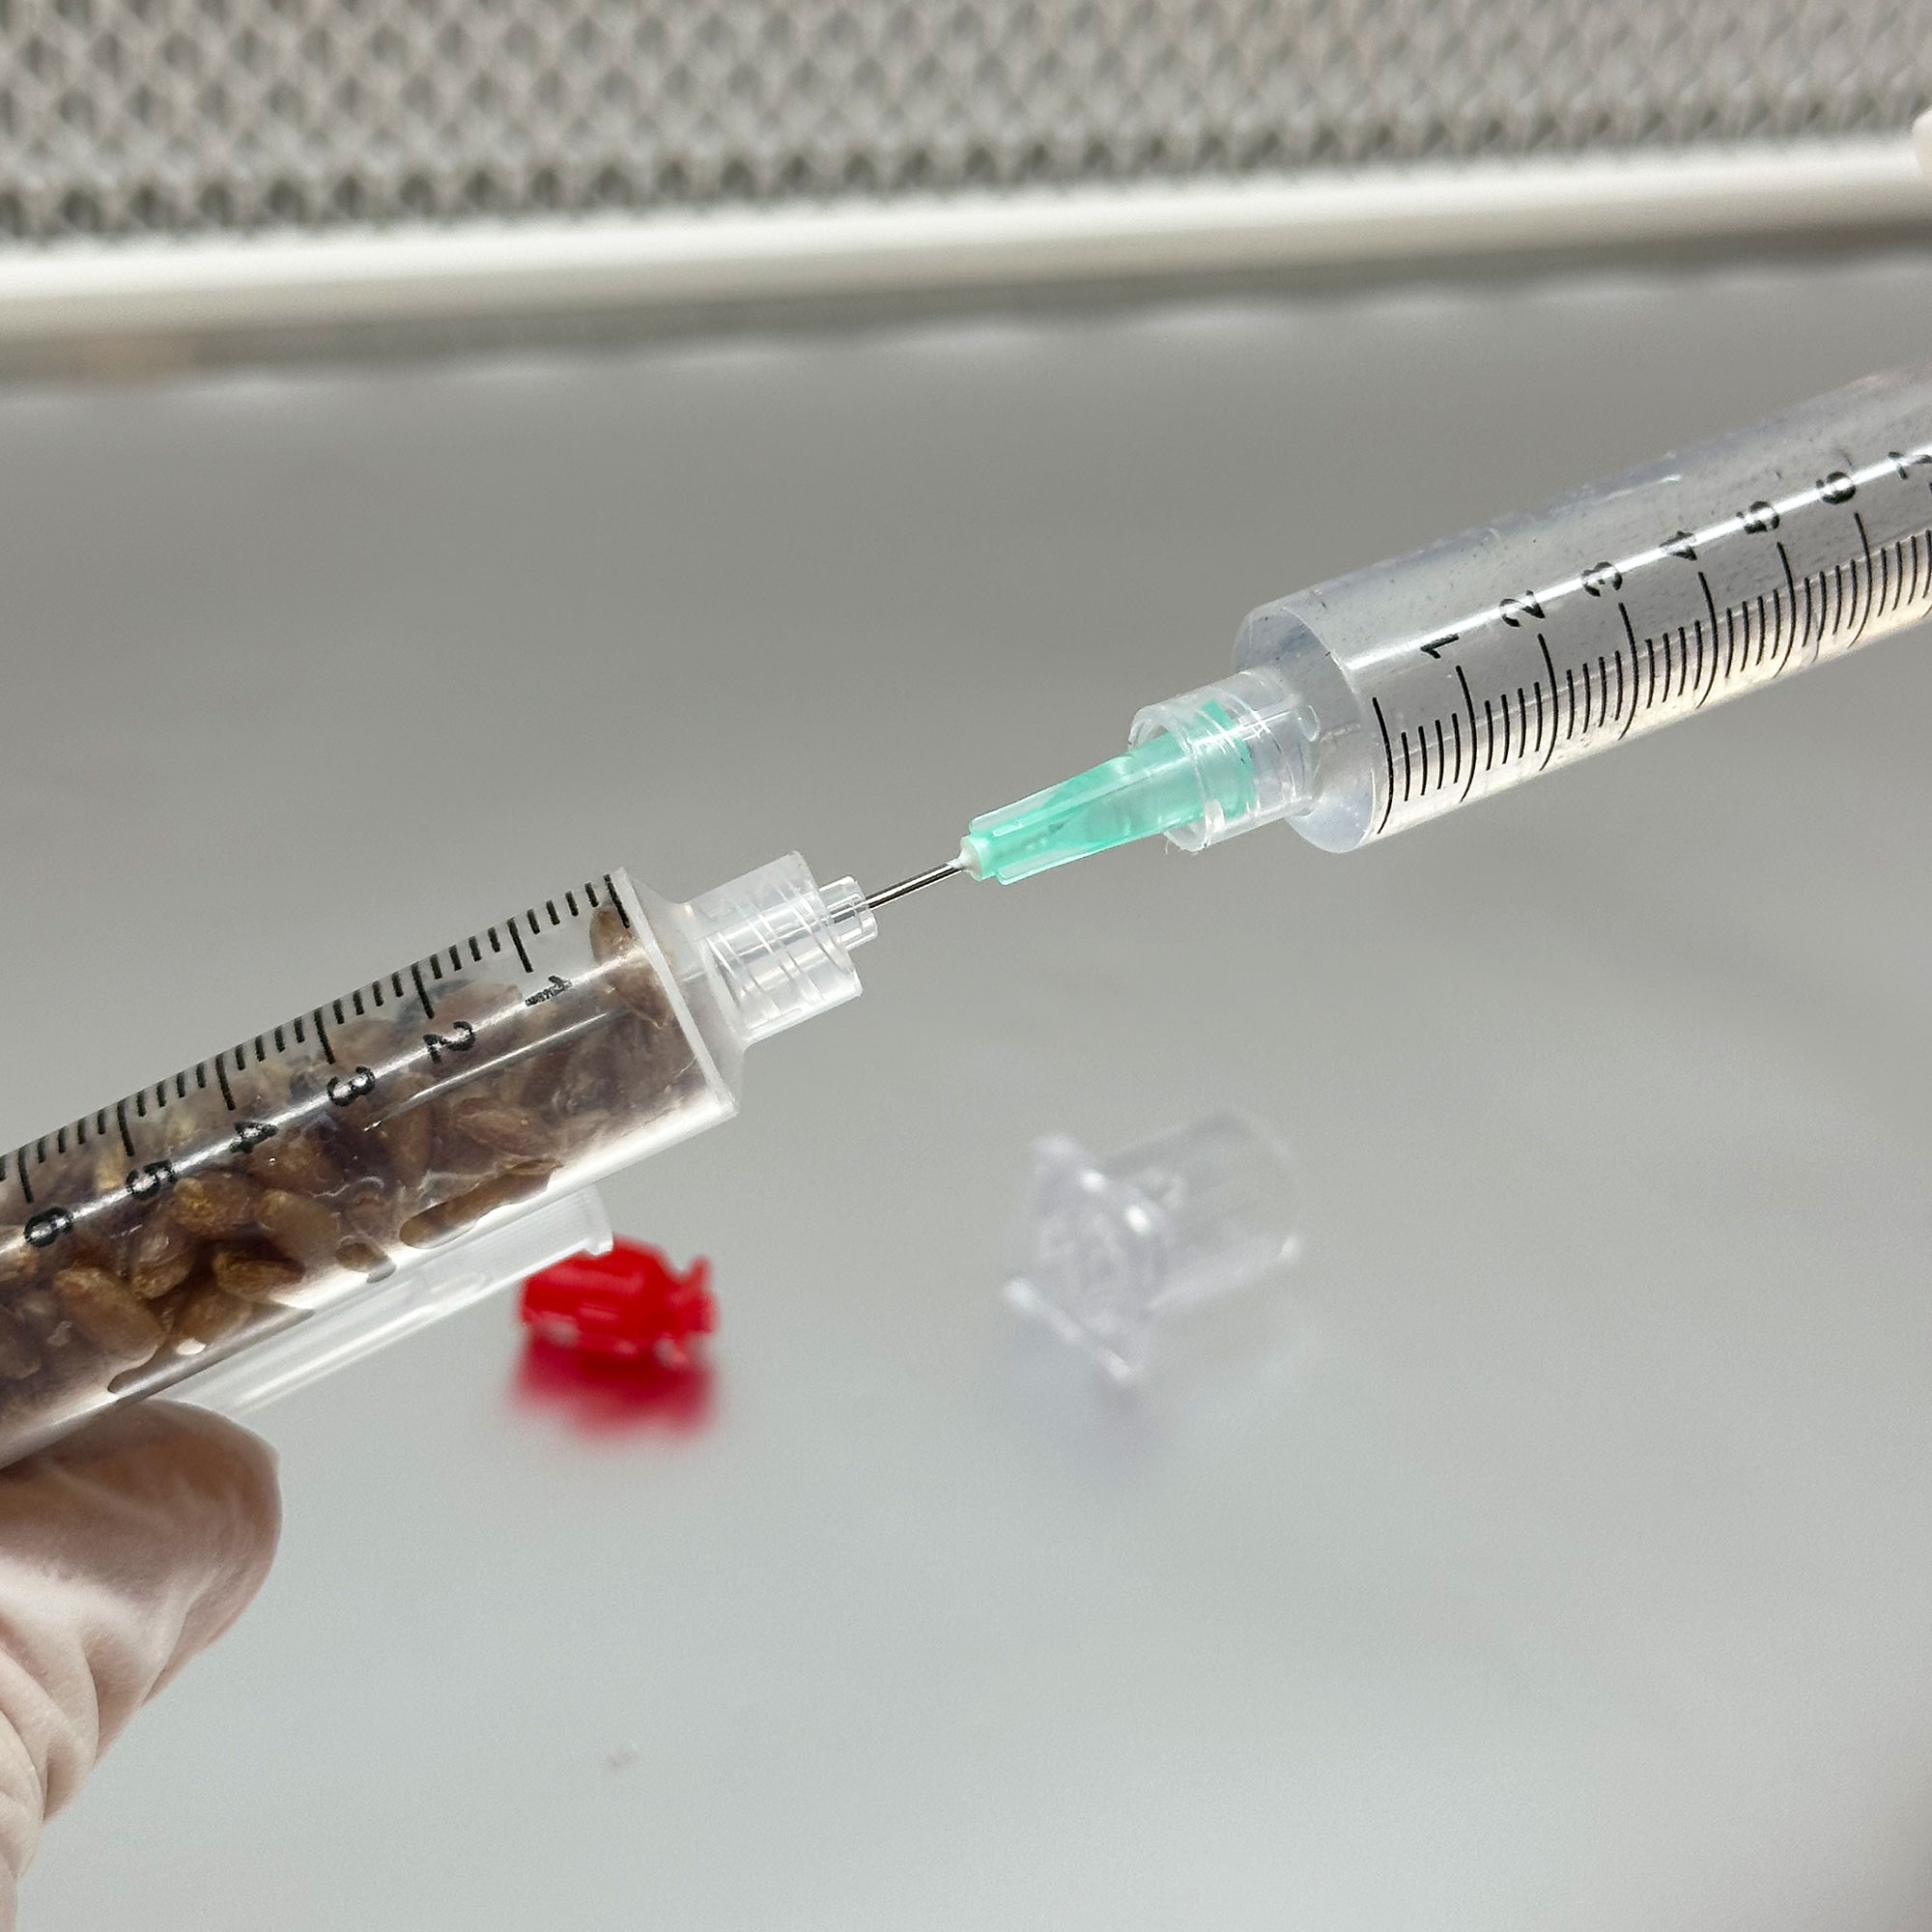
- 1x sterile 21G needle (for attaching to your own spore syringe to inoculate the grain syringe)
- 1x alcohol wipe
Grain Deluxe (three tests + tools + use to inoculate)
This more advanced set of grain testing syringes come with filtered air-holes in the syringe, allowing complete colonisation of all of available grain. While this may be overkill for establishing clean growth, it does come in super useful for generating lots of colonised grains for using with the G2G syringe method we’ve demonstrated in the product photos (and this deluxe version even comes with the sterile scalpels for cutting the syringe open).
- 3x breathable 12ml syringes pre-filled with sterile hydrated grain (white tape filters present)
- 3x sterile swabs (for inoculating grain directly from spore prints if desired)
- 3x sterile scalpels (for cutting grow bags / for the G2G syringe method)
- 3x alcohol wipes
Agar (single test)
- 1x sterile 12ml syringe containing ~3 ml nutrient agar (with headspace for air)
- 1x sterile swab
- 1x sterile 18G needle
- 1x alcohol wipe
Agar Deluxe (four tests total)
- 1x sterile 12ml syringe filled with nutrient agar (enough to make 4× tests)
- 3x empty sterile 12ml syringes
- 4x sterile swabs
- 4x sterile 18G needles
- 3x sterile luer-lock caps
- 4x alcohol wipes (one per syringe)
How they work
Grain (filtered air exchange): Each grain syringe has a tiny drill hole covered by white tape. Do not remove this tape. It provides filtered air exchange so mycelium can fully colonise the grain. Without that filtered exchange, colonisation typically stalls early (around one‑third) instead of completing.
Agar (agar in a syringe): Agar is pre-set inside a syringe with headspace, giving mycelium room to grow. Once healthy growth is observed, you can attach a needle and inject mycelium-covered agar directly to inoculate your grow kit.
How to use
General tips
- Work clean – ideally inside a Still Air Box (SAB), especially for agar work.
- Incubate at 20-26°C. Warmer is faster; cooler is slower.
- Typical observation window: 3 – 7 days for visible growth.
- Only perform a smell test if you do not plan to use that syringe as a G2G syringe later – removing the plunger can introduce contaminants.
Grain (for gourmet spore syringes)
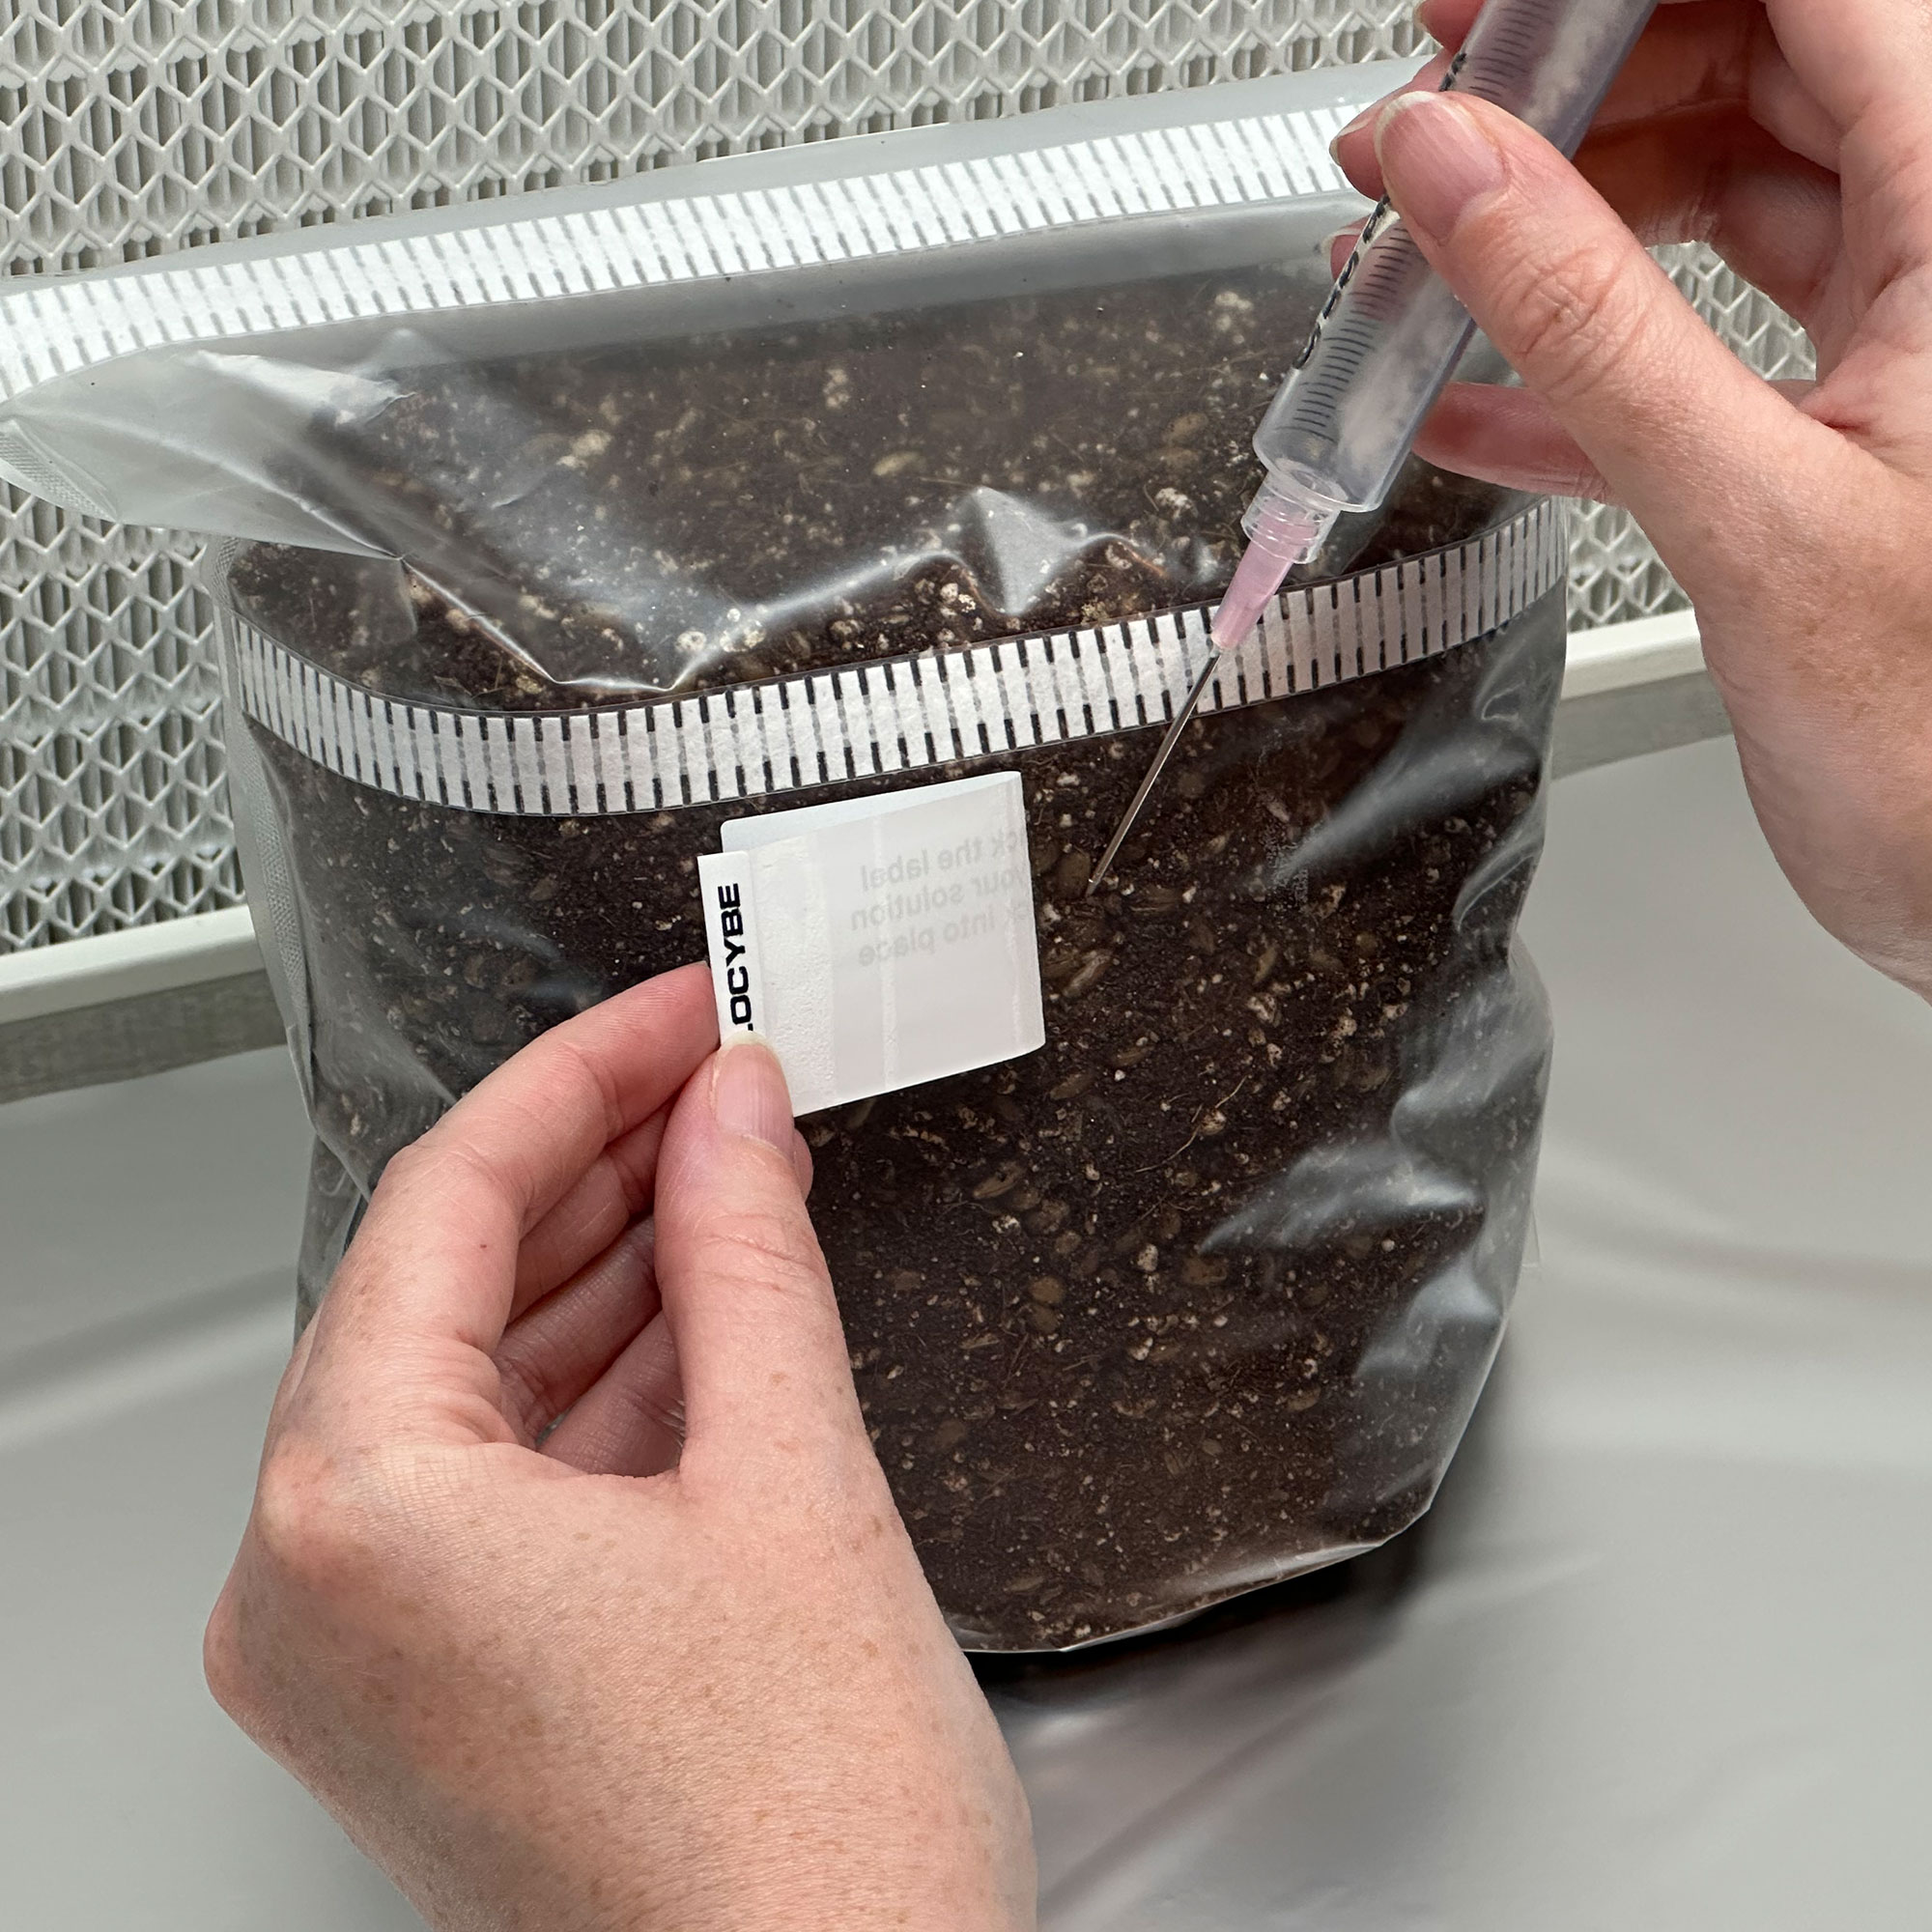
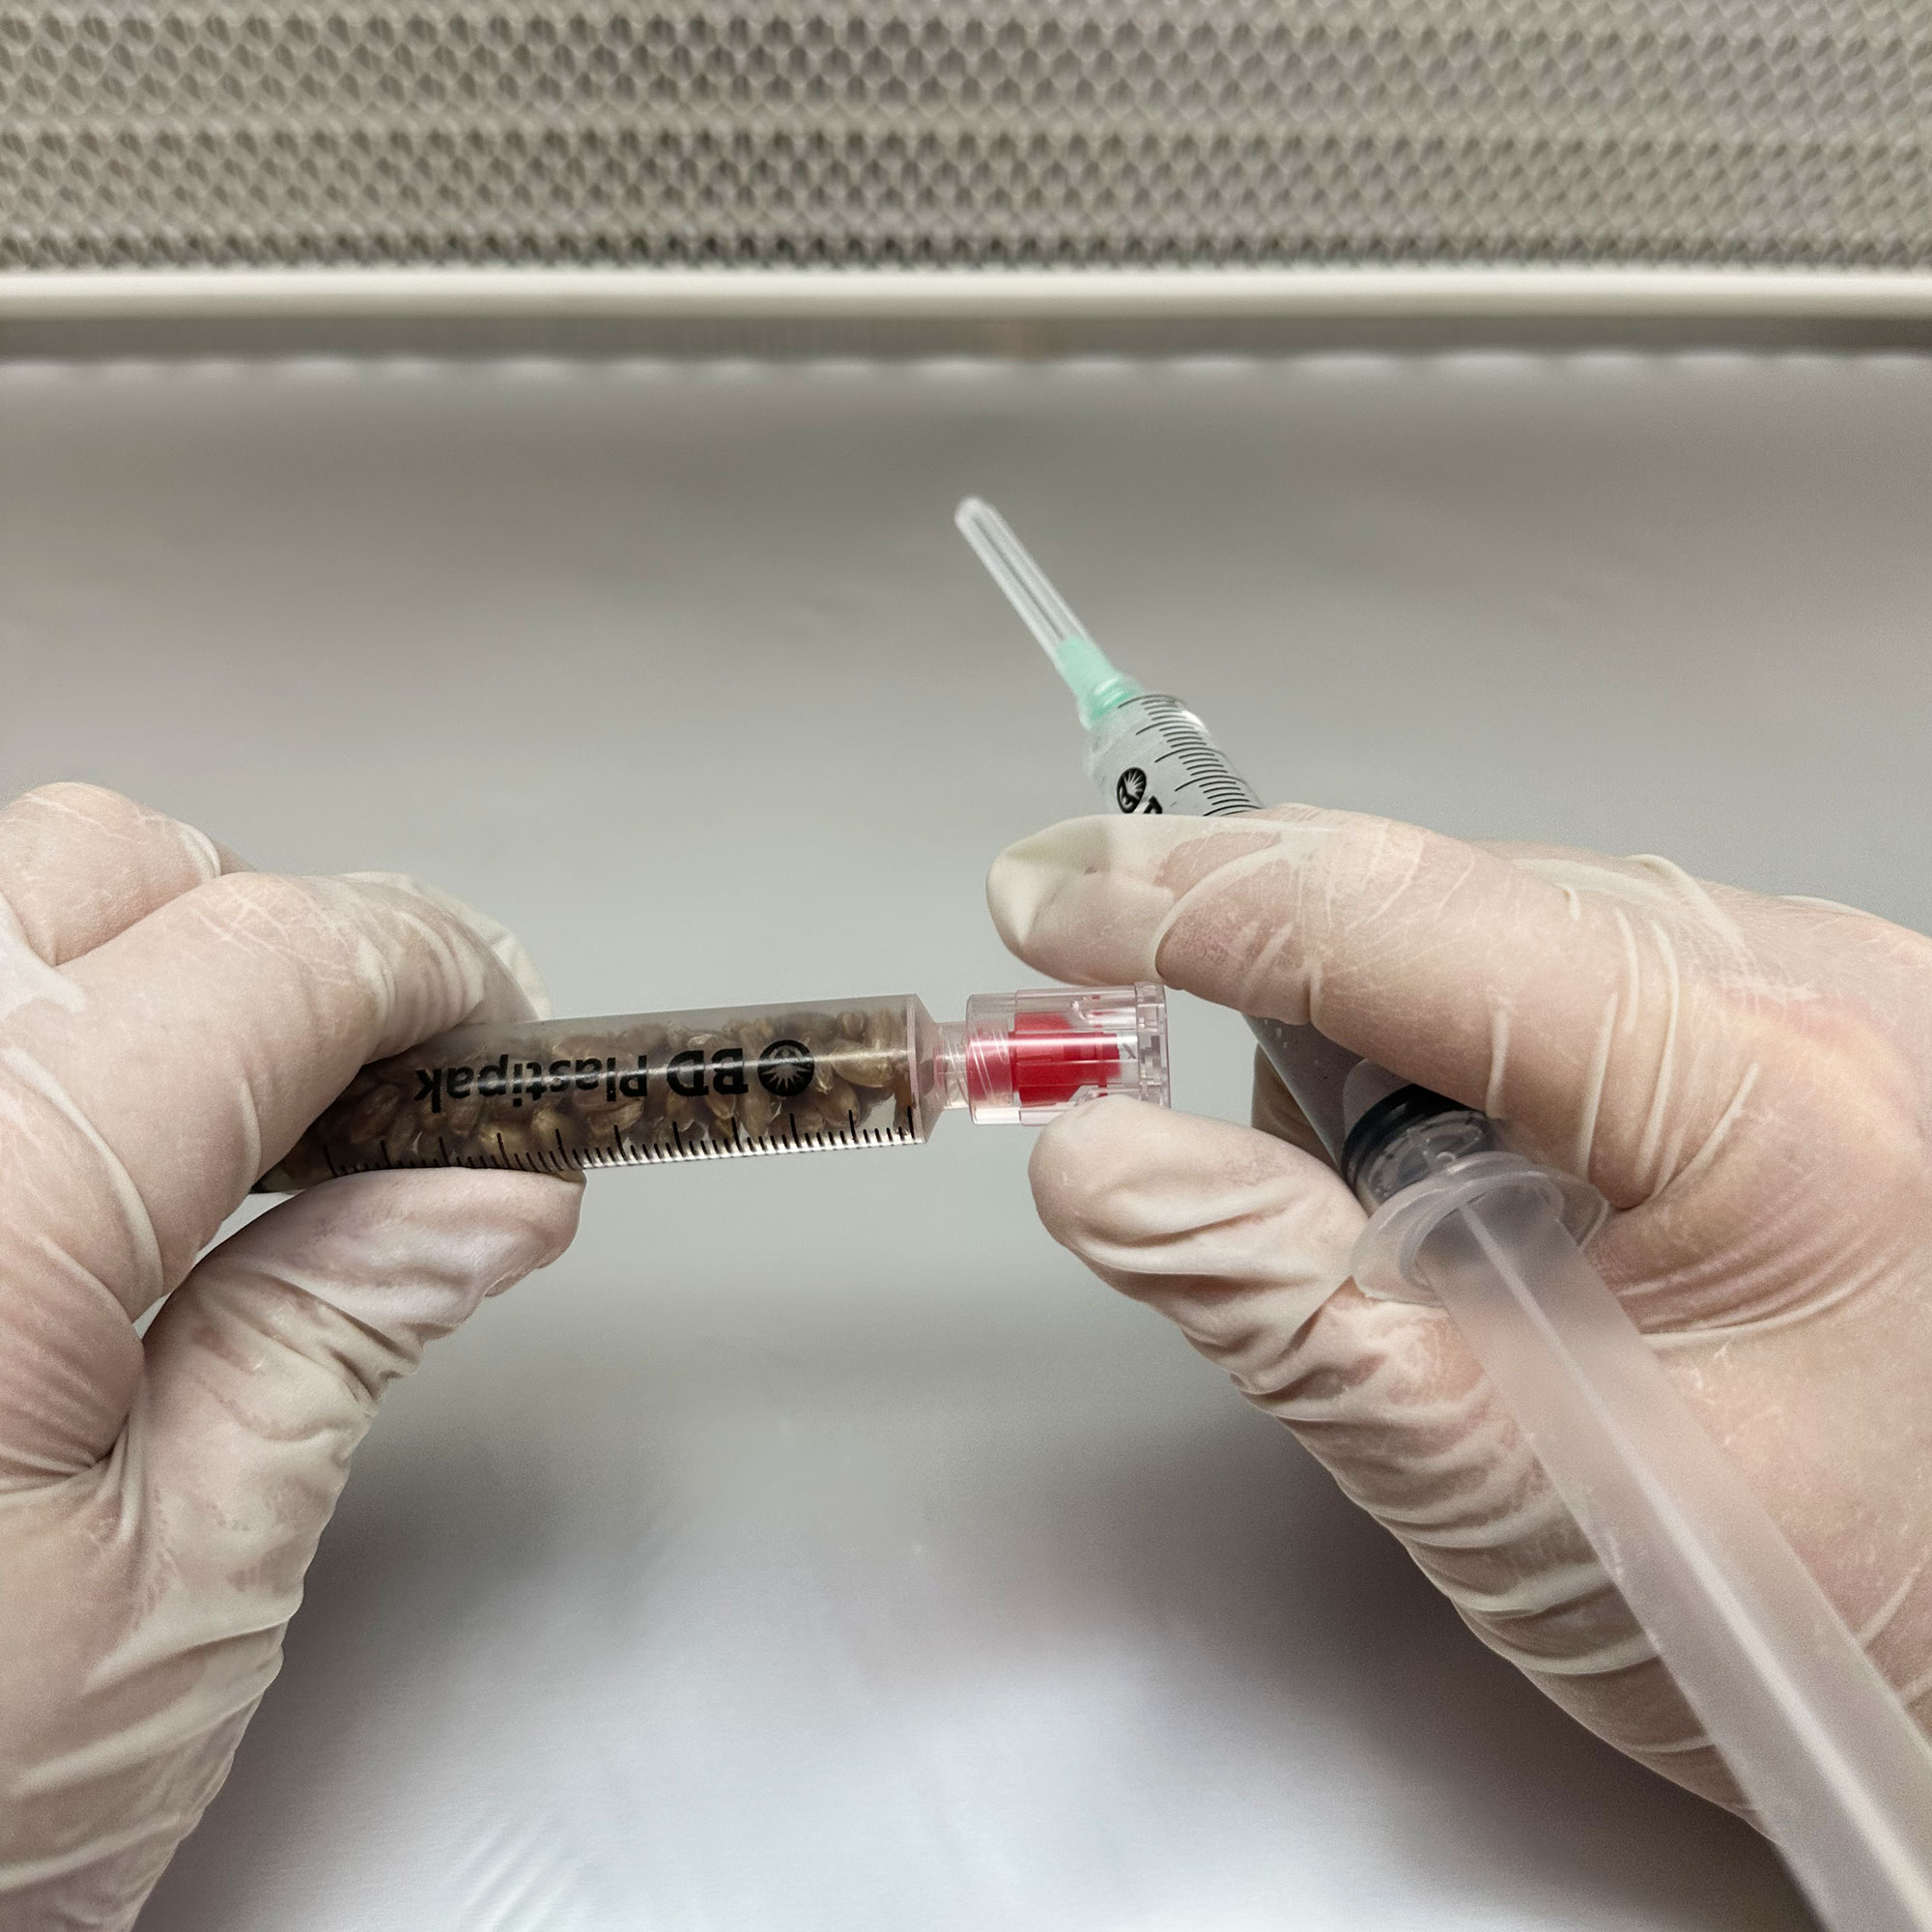
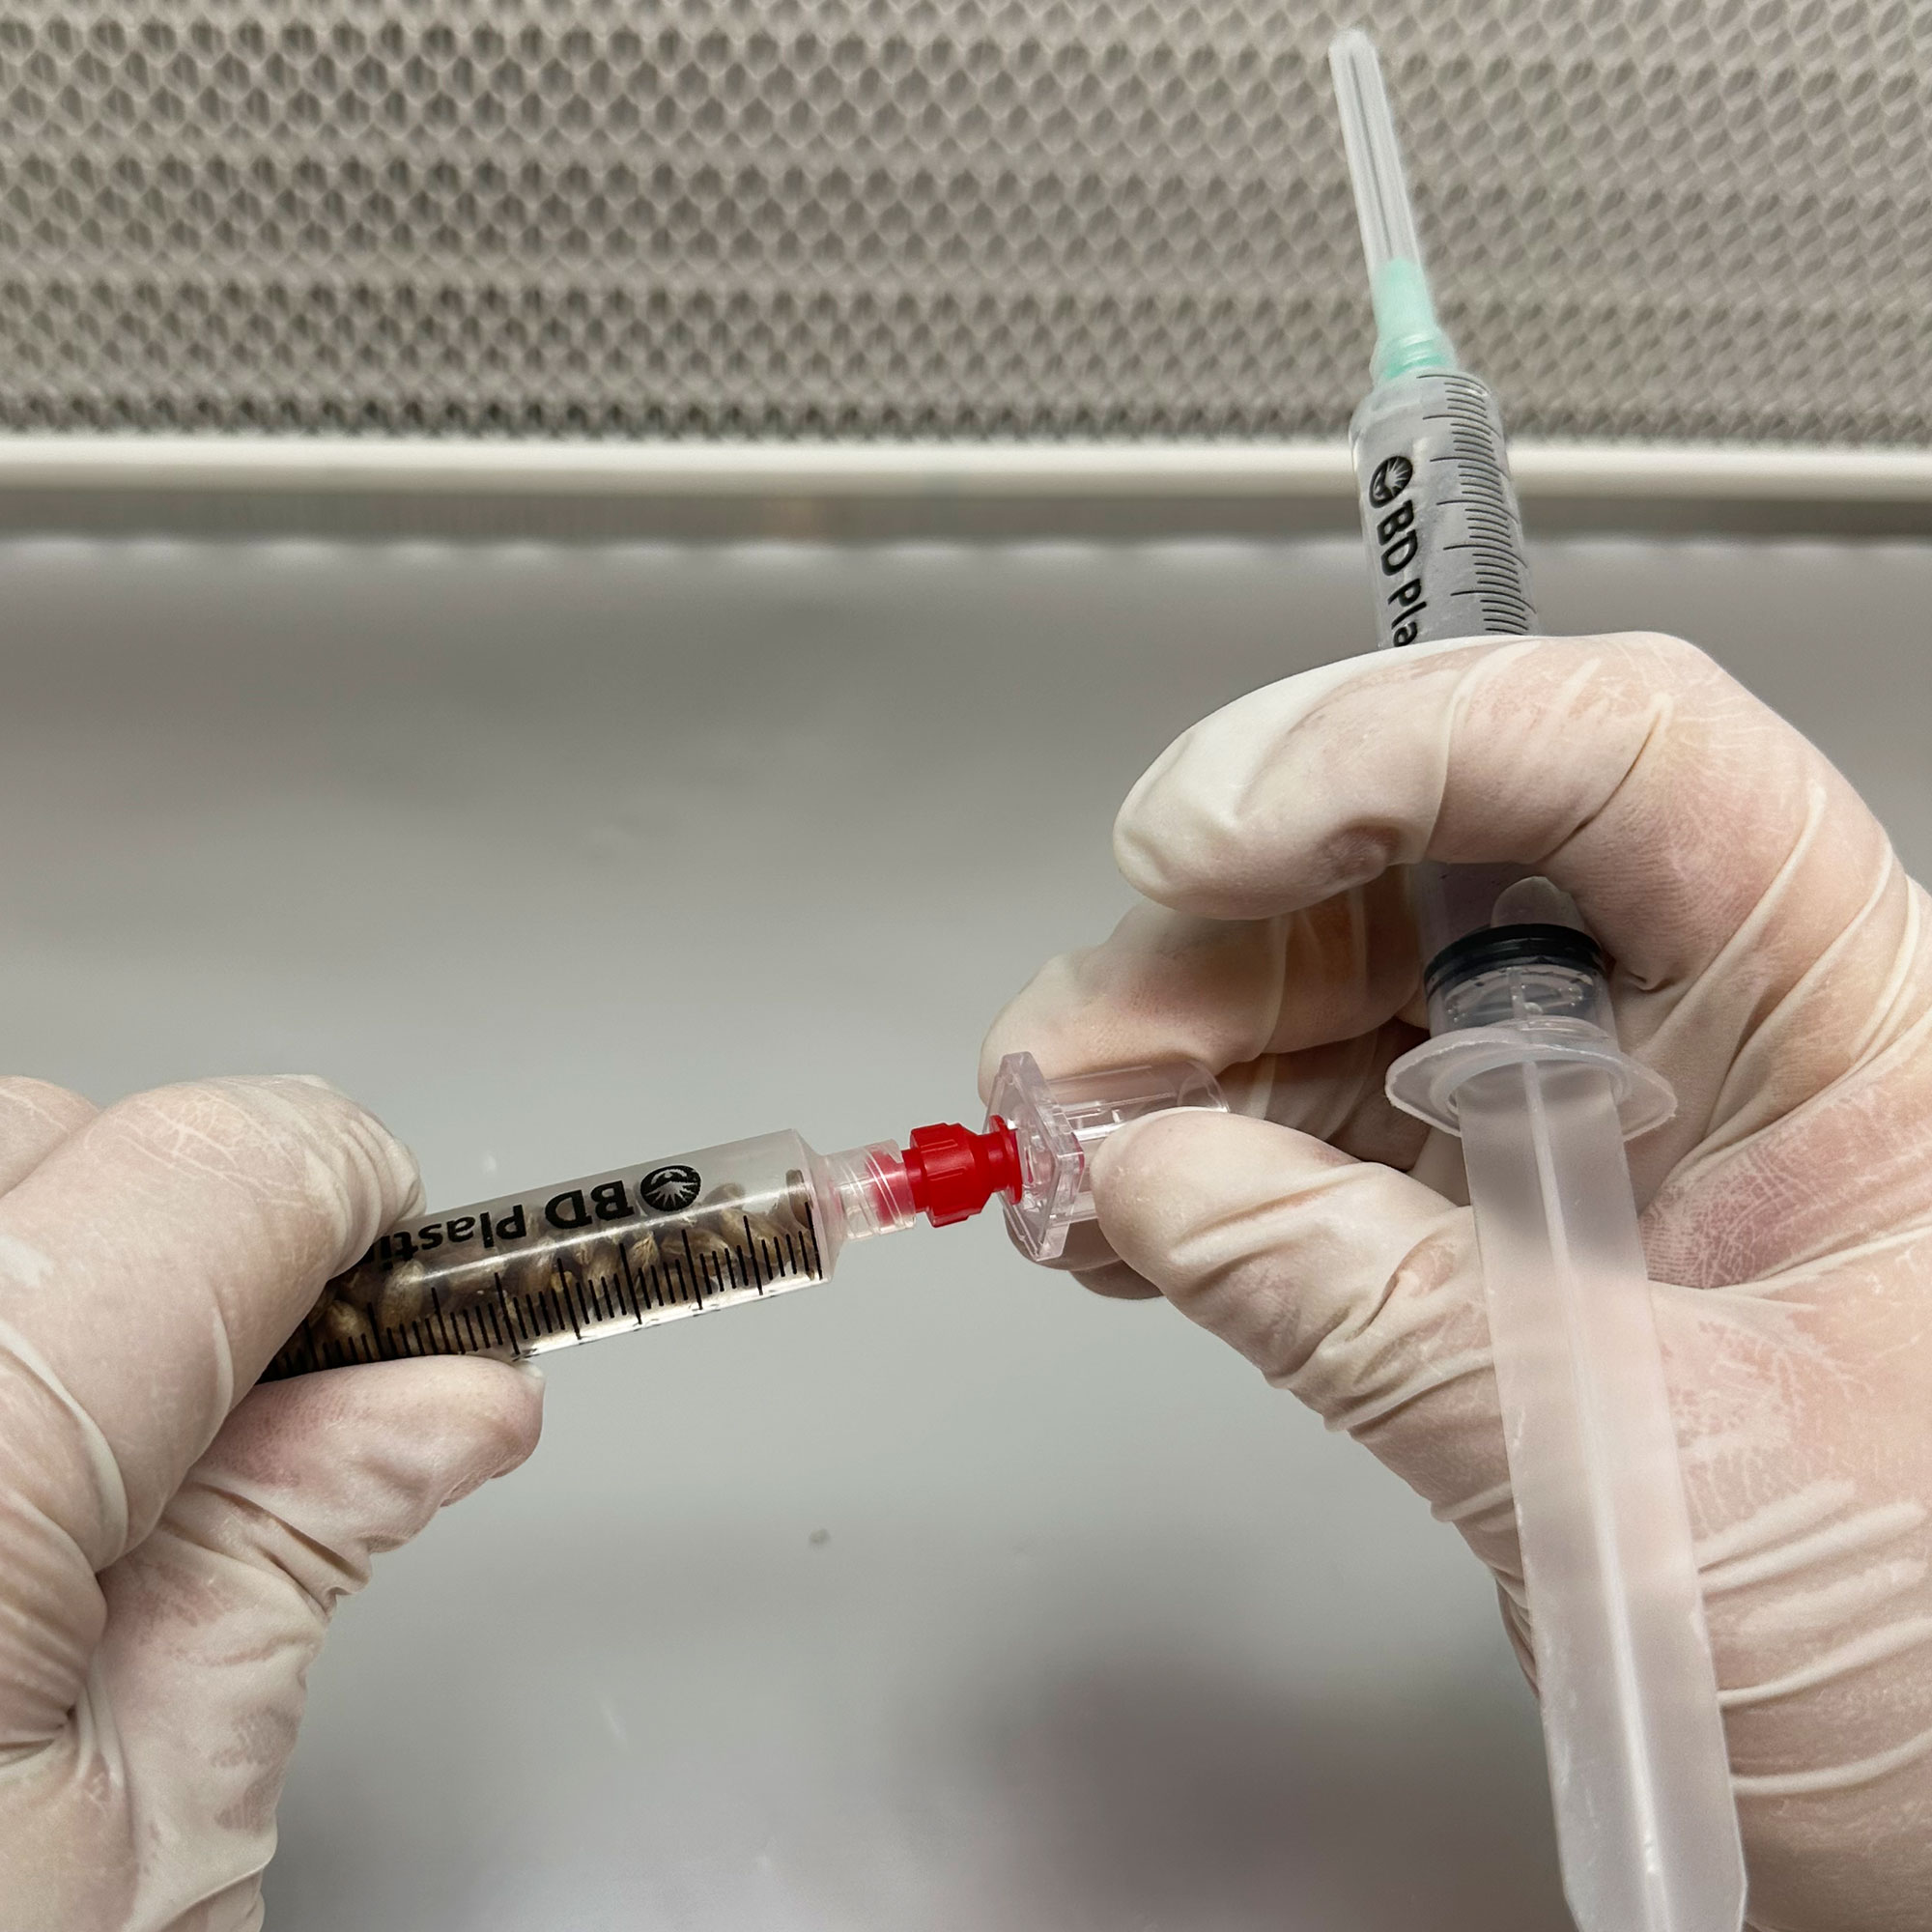
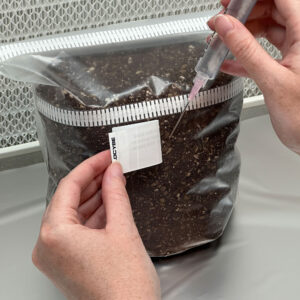
- Uncap the grain SporeKit syringe. Using your own spore syringe, inject ~0.1 ml into the grain syringe.
- Re-cap the grain syringe with the same luer-lock cap.
- Incubate at 20-26°C. Keep the white tape filter on – do not remove it.
- Check for healthy mycelium over 3 – 7 days.
Grain Deluxe – using as G2G syringes (advanced, optional)
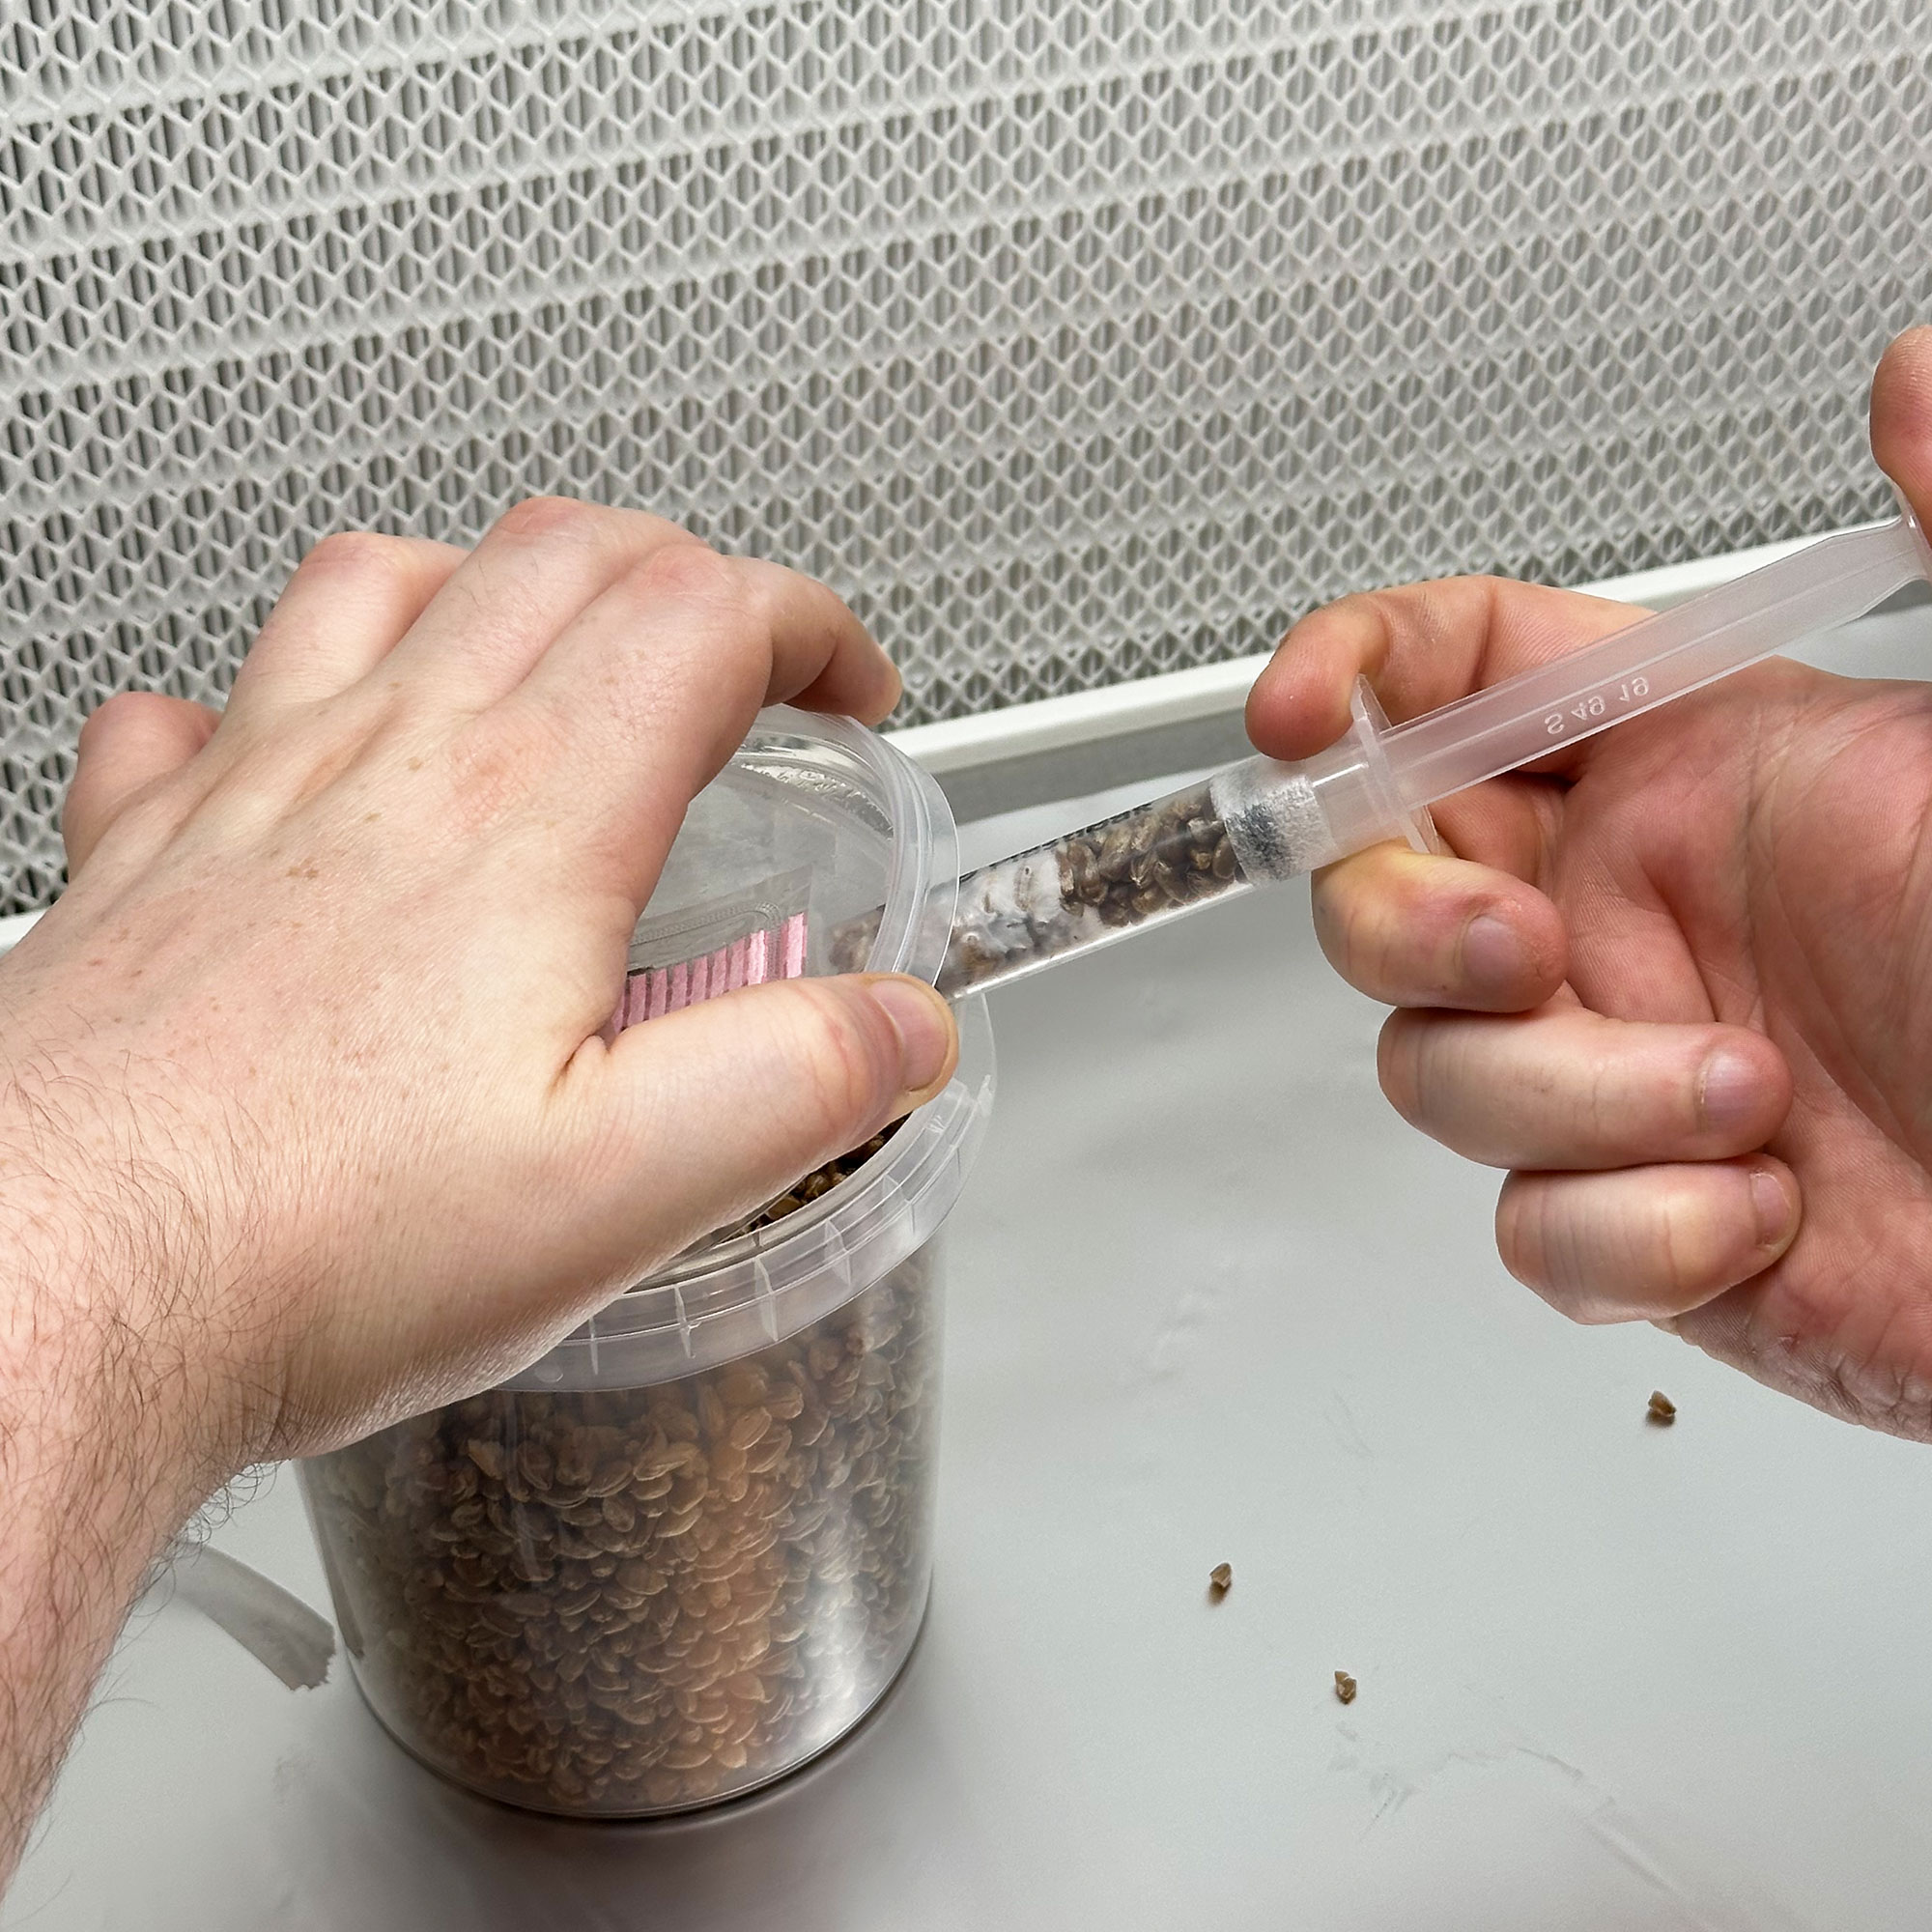
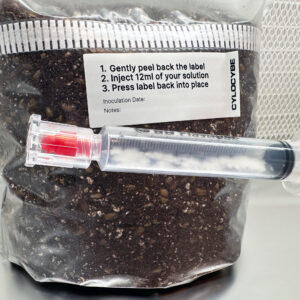
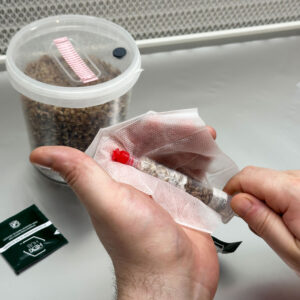
With clean, colonised grain in the syringe, you can inject colonised grain into a SpawnTub or grow bag via a small slit/cut. Our SpawnTubs are tape-wrapped at the lid to help keep the rim clean; peel the tape, crack the lid just enough, and inject the colonised grain. Many growers also make a small slit in a MycMonster or bag to inject. This “G2G syringe” method is a Cylocybe innovation we’ve used extensively.
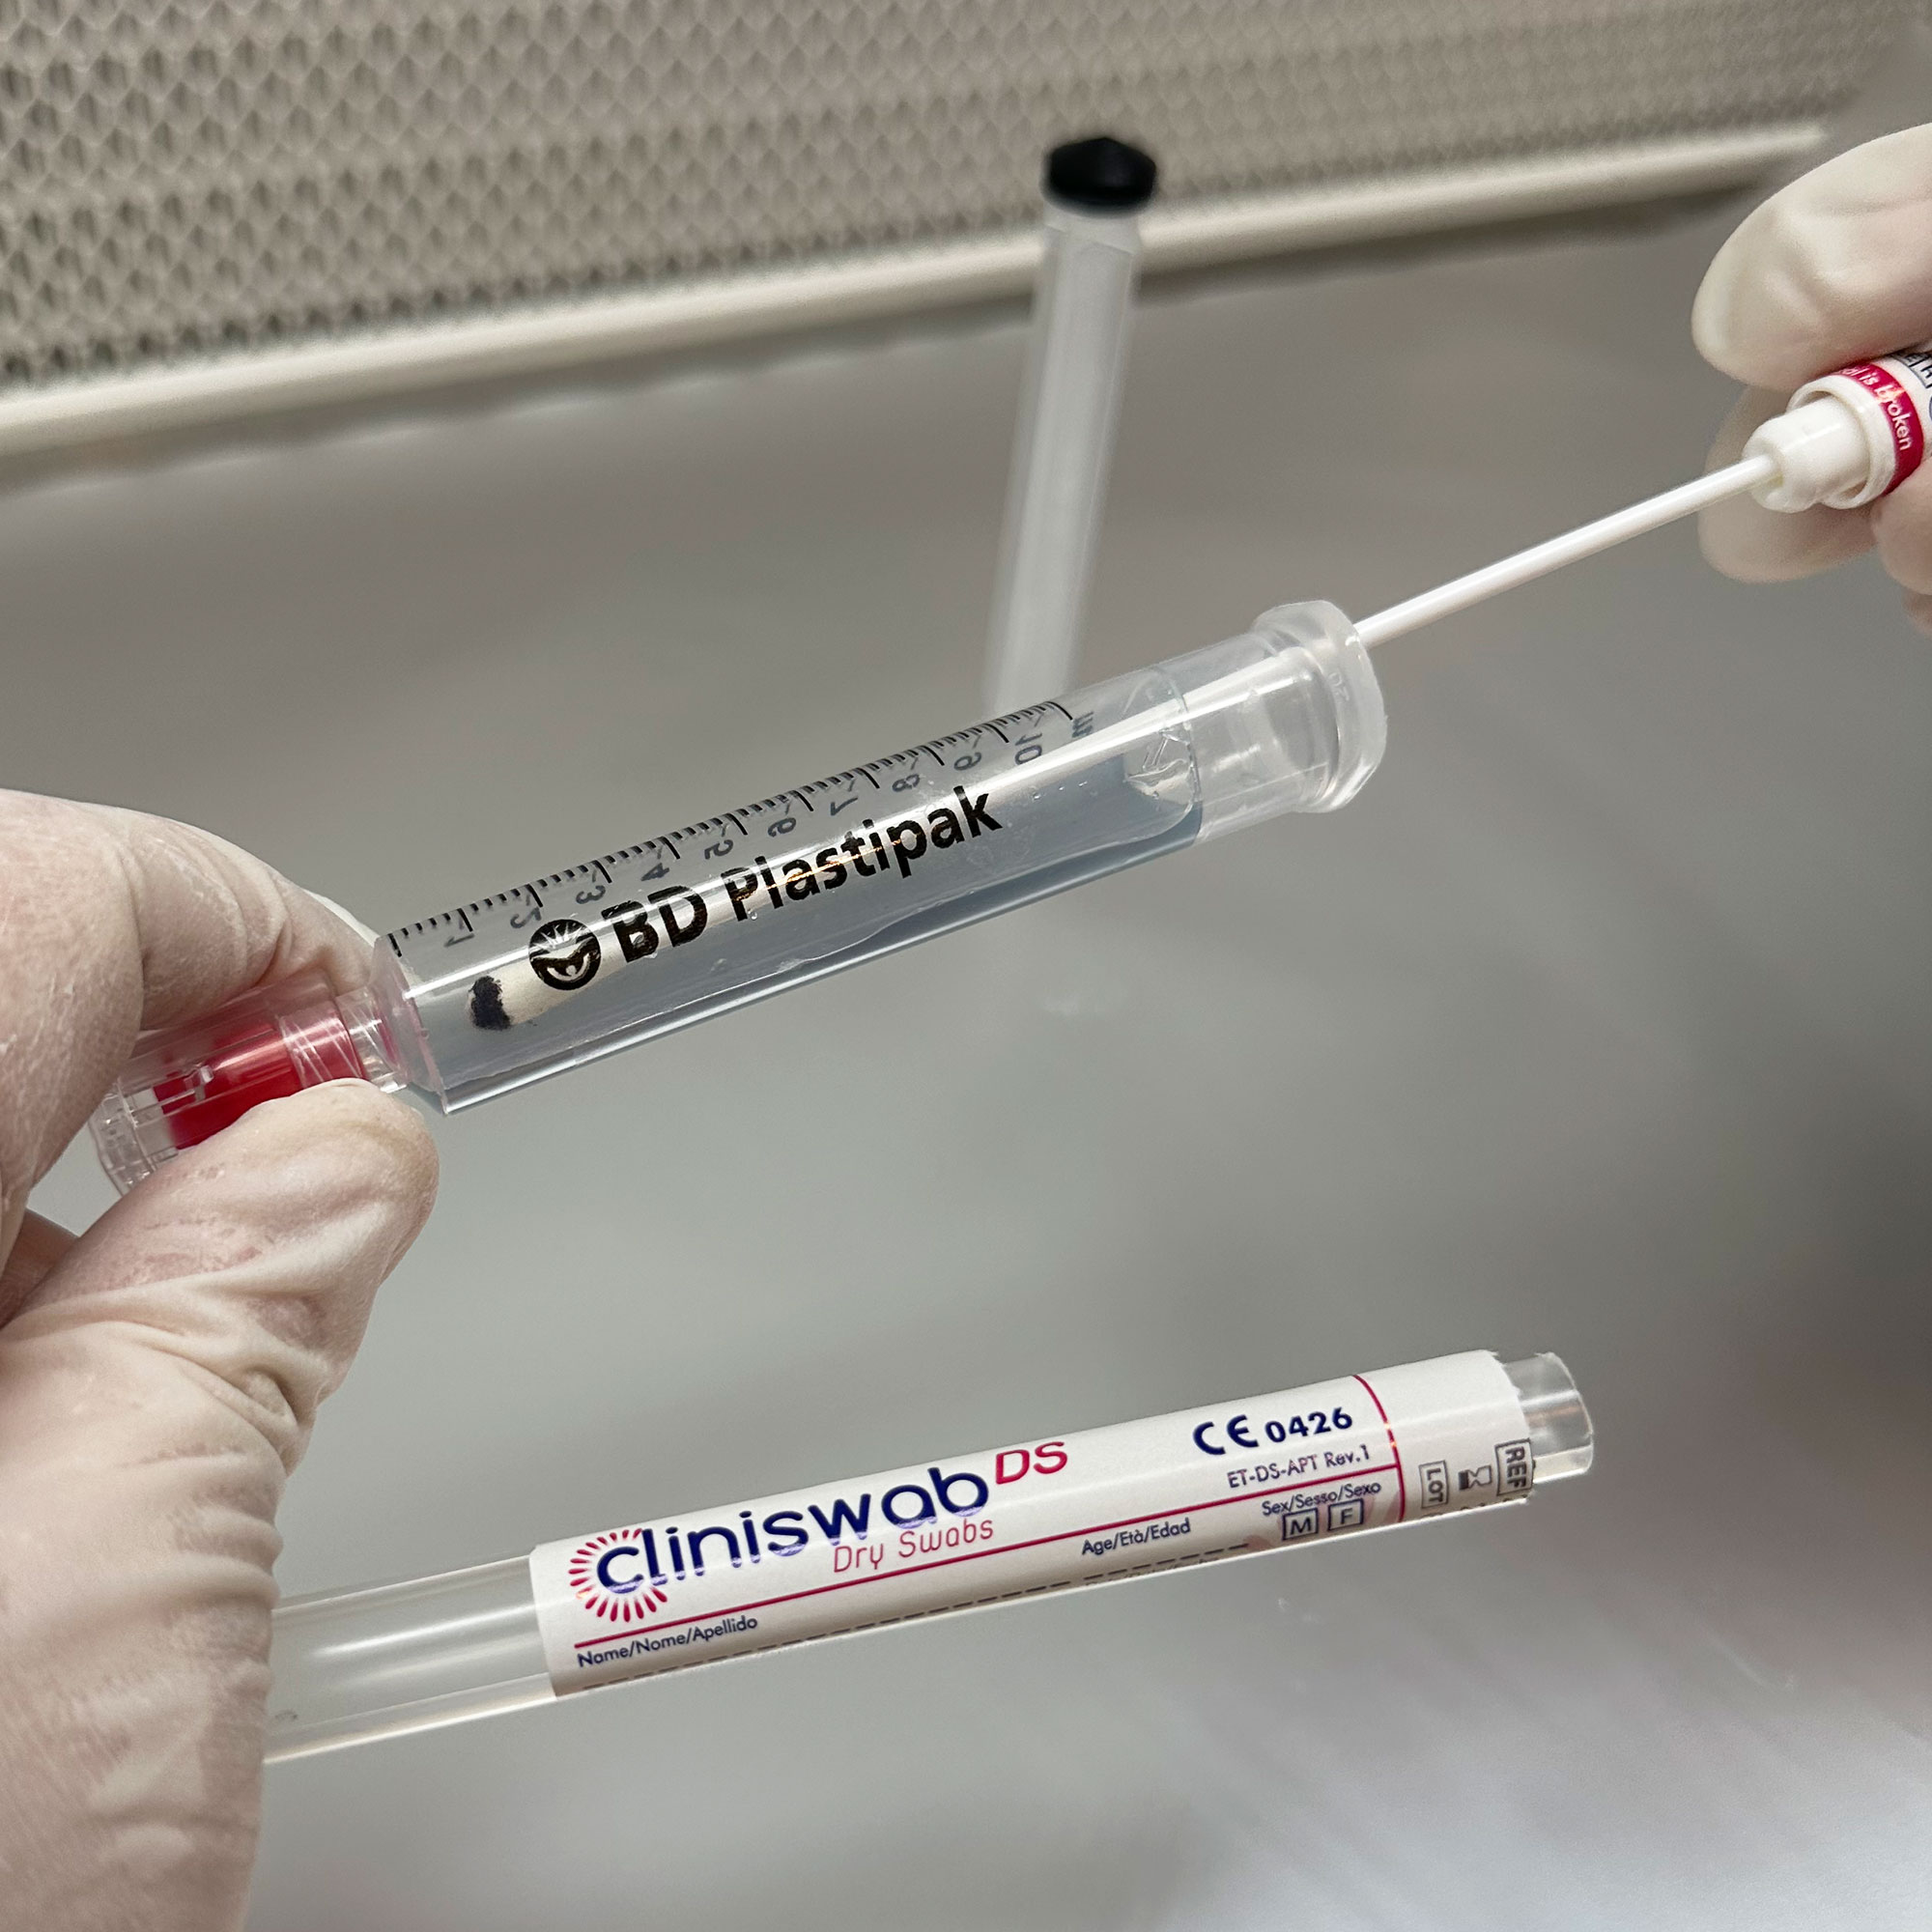
Agar (ideal for gourmet spore swabbing)
Work within a SAB or in-front of a laminar flow hood for this.
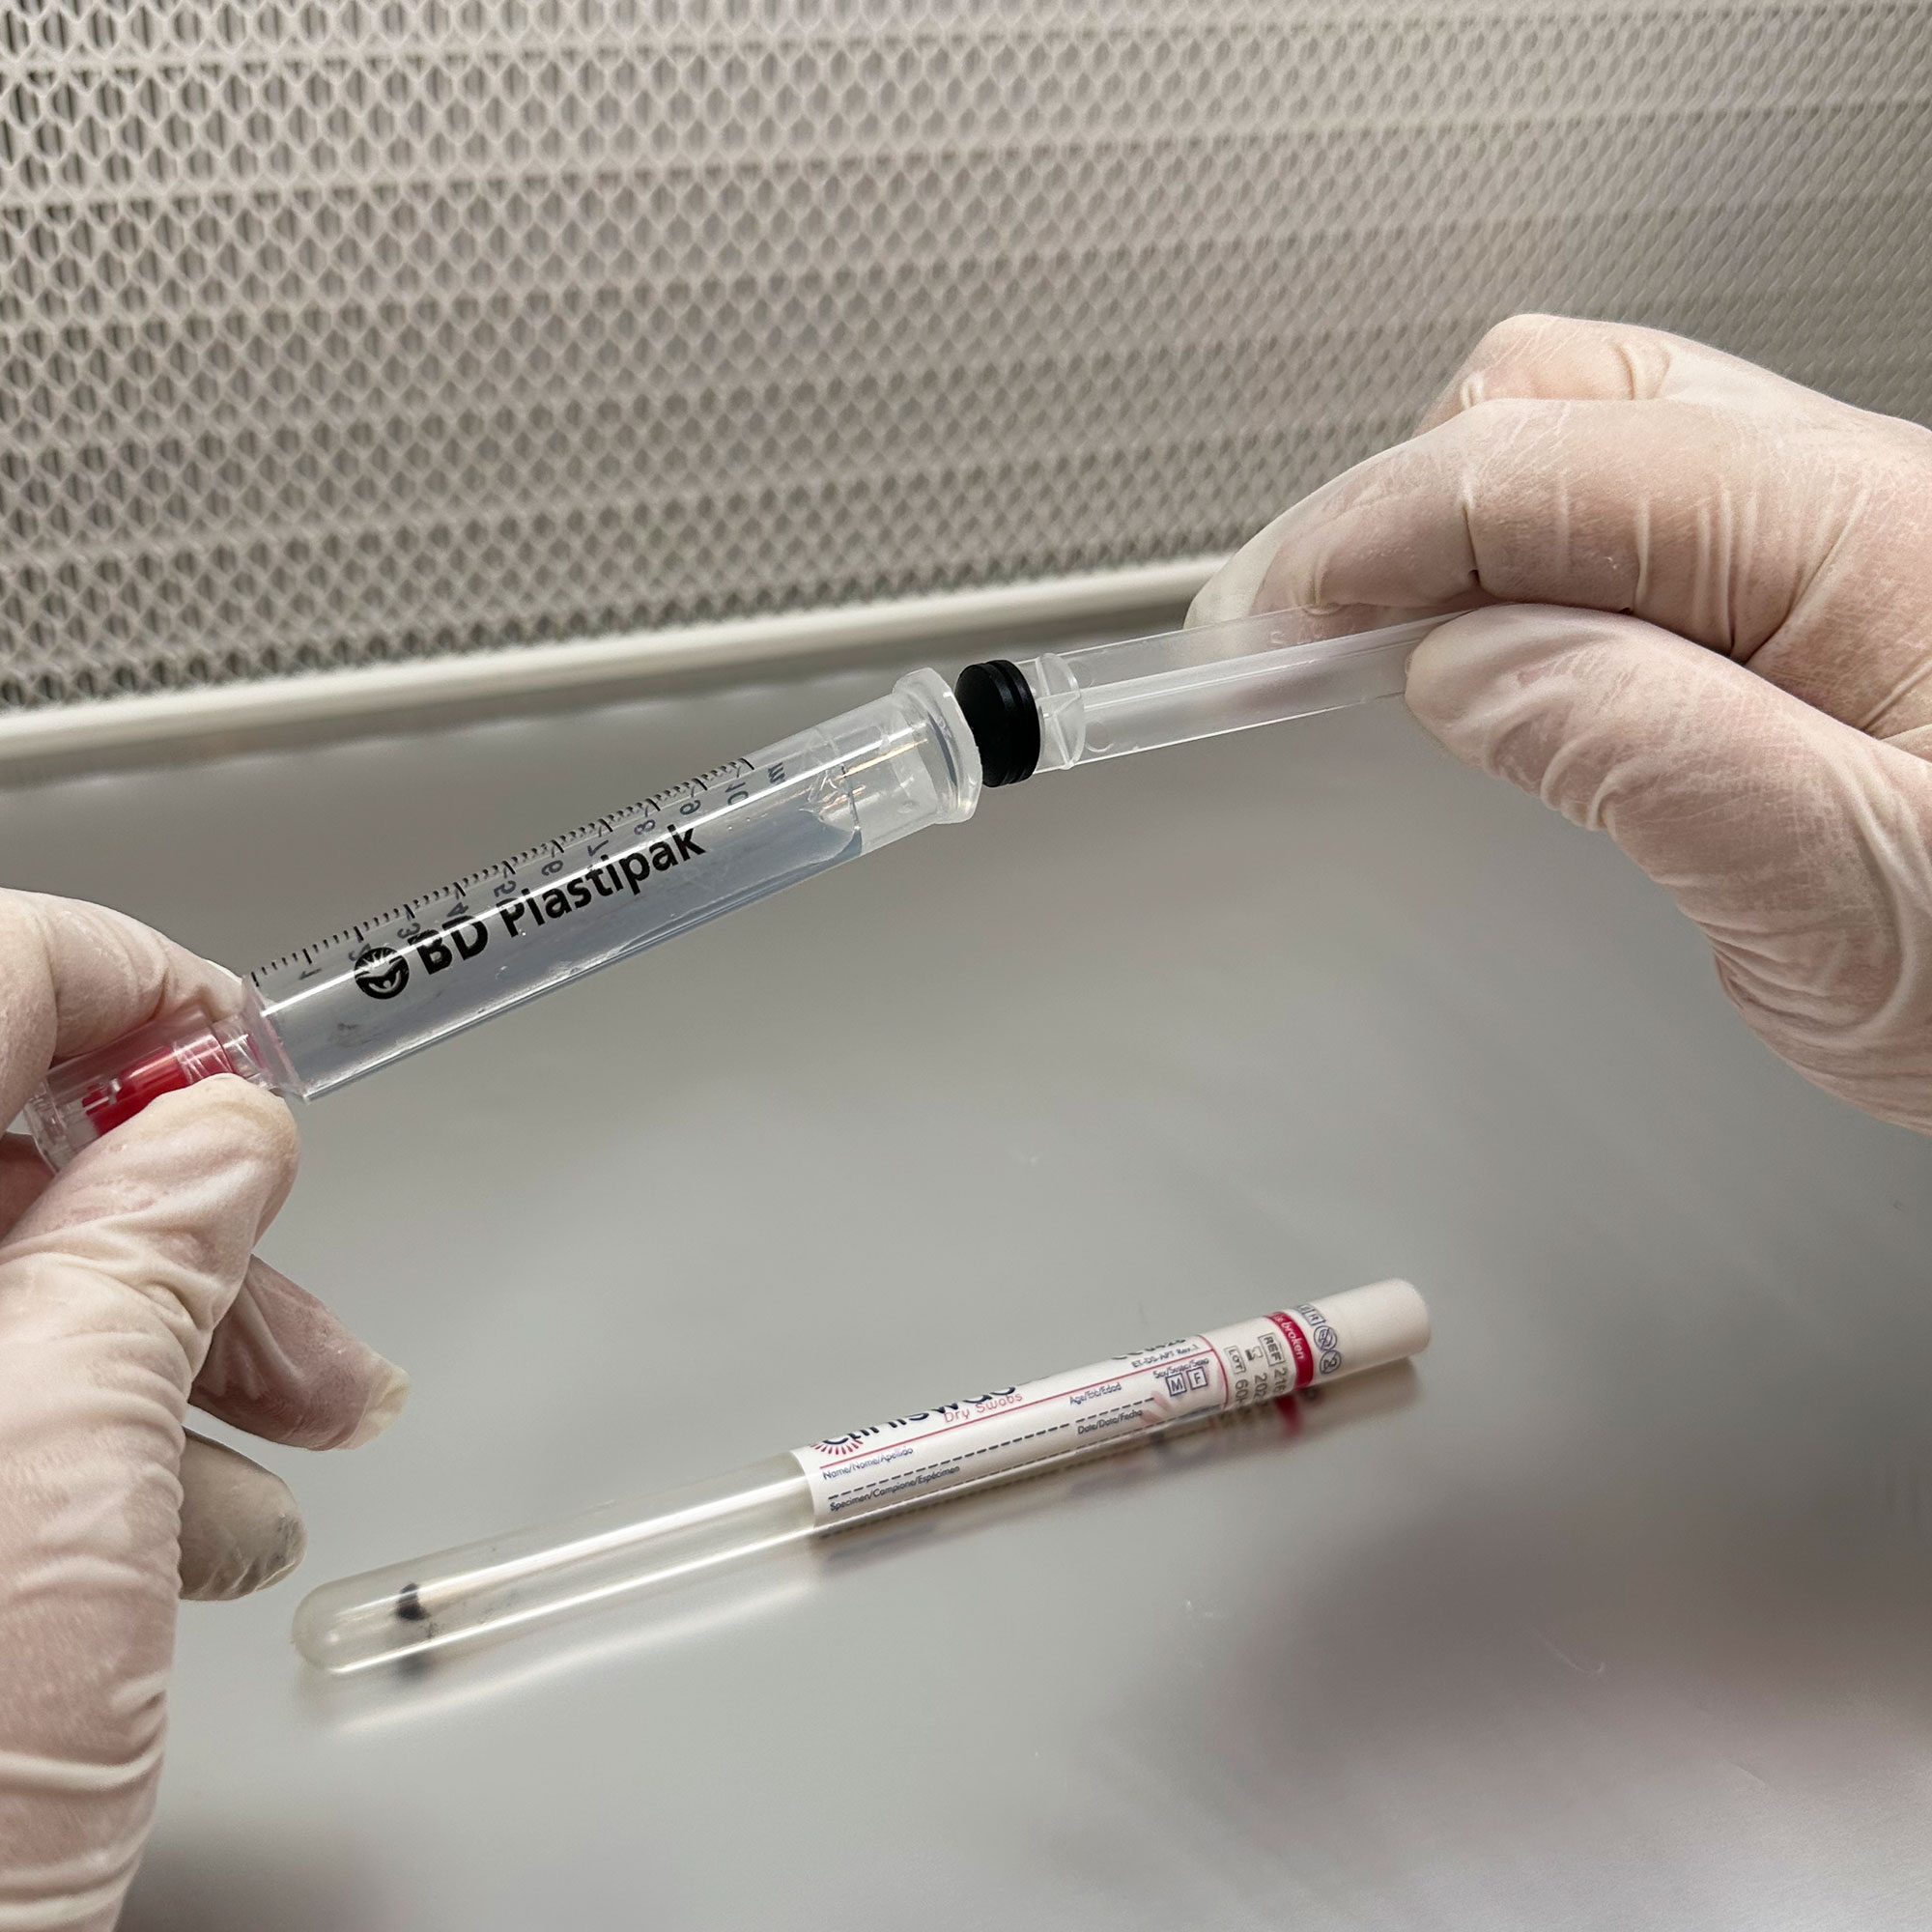
- Pull the plunger to access the agar surface. Place the plunger on a brand new sheet of rolled out tinfoil (an extremely clean surface) and within a SAB.
- Gently rub your gourmet spore swab across the agar surface.
- Reinsert the plunger. Incubate at 20 – 26°C.
- Observe growth over 3 – 7 days.
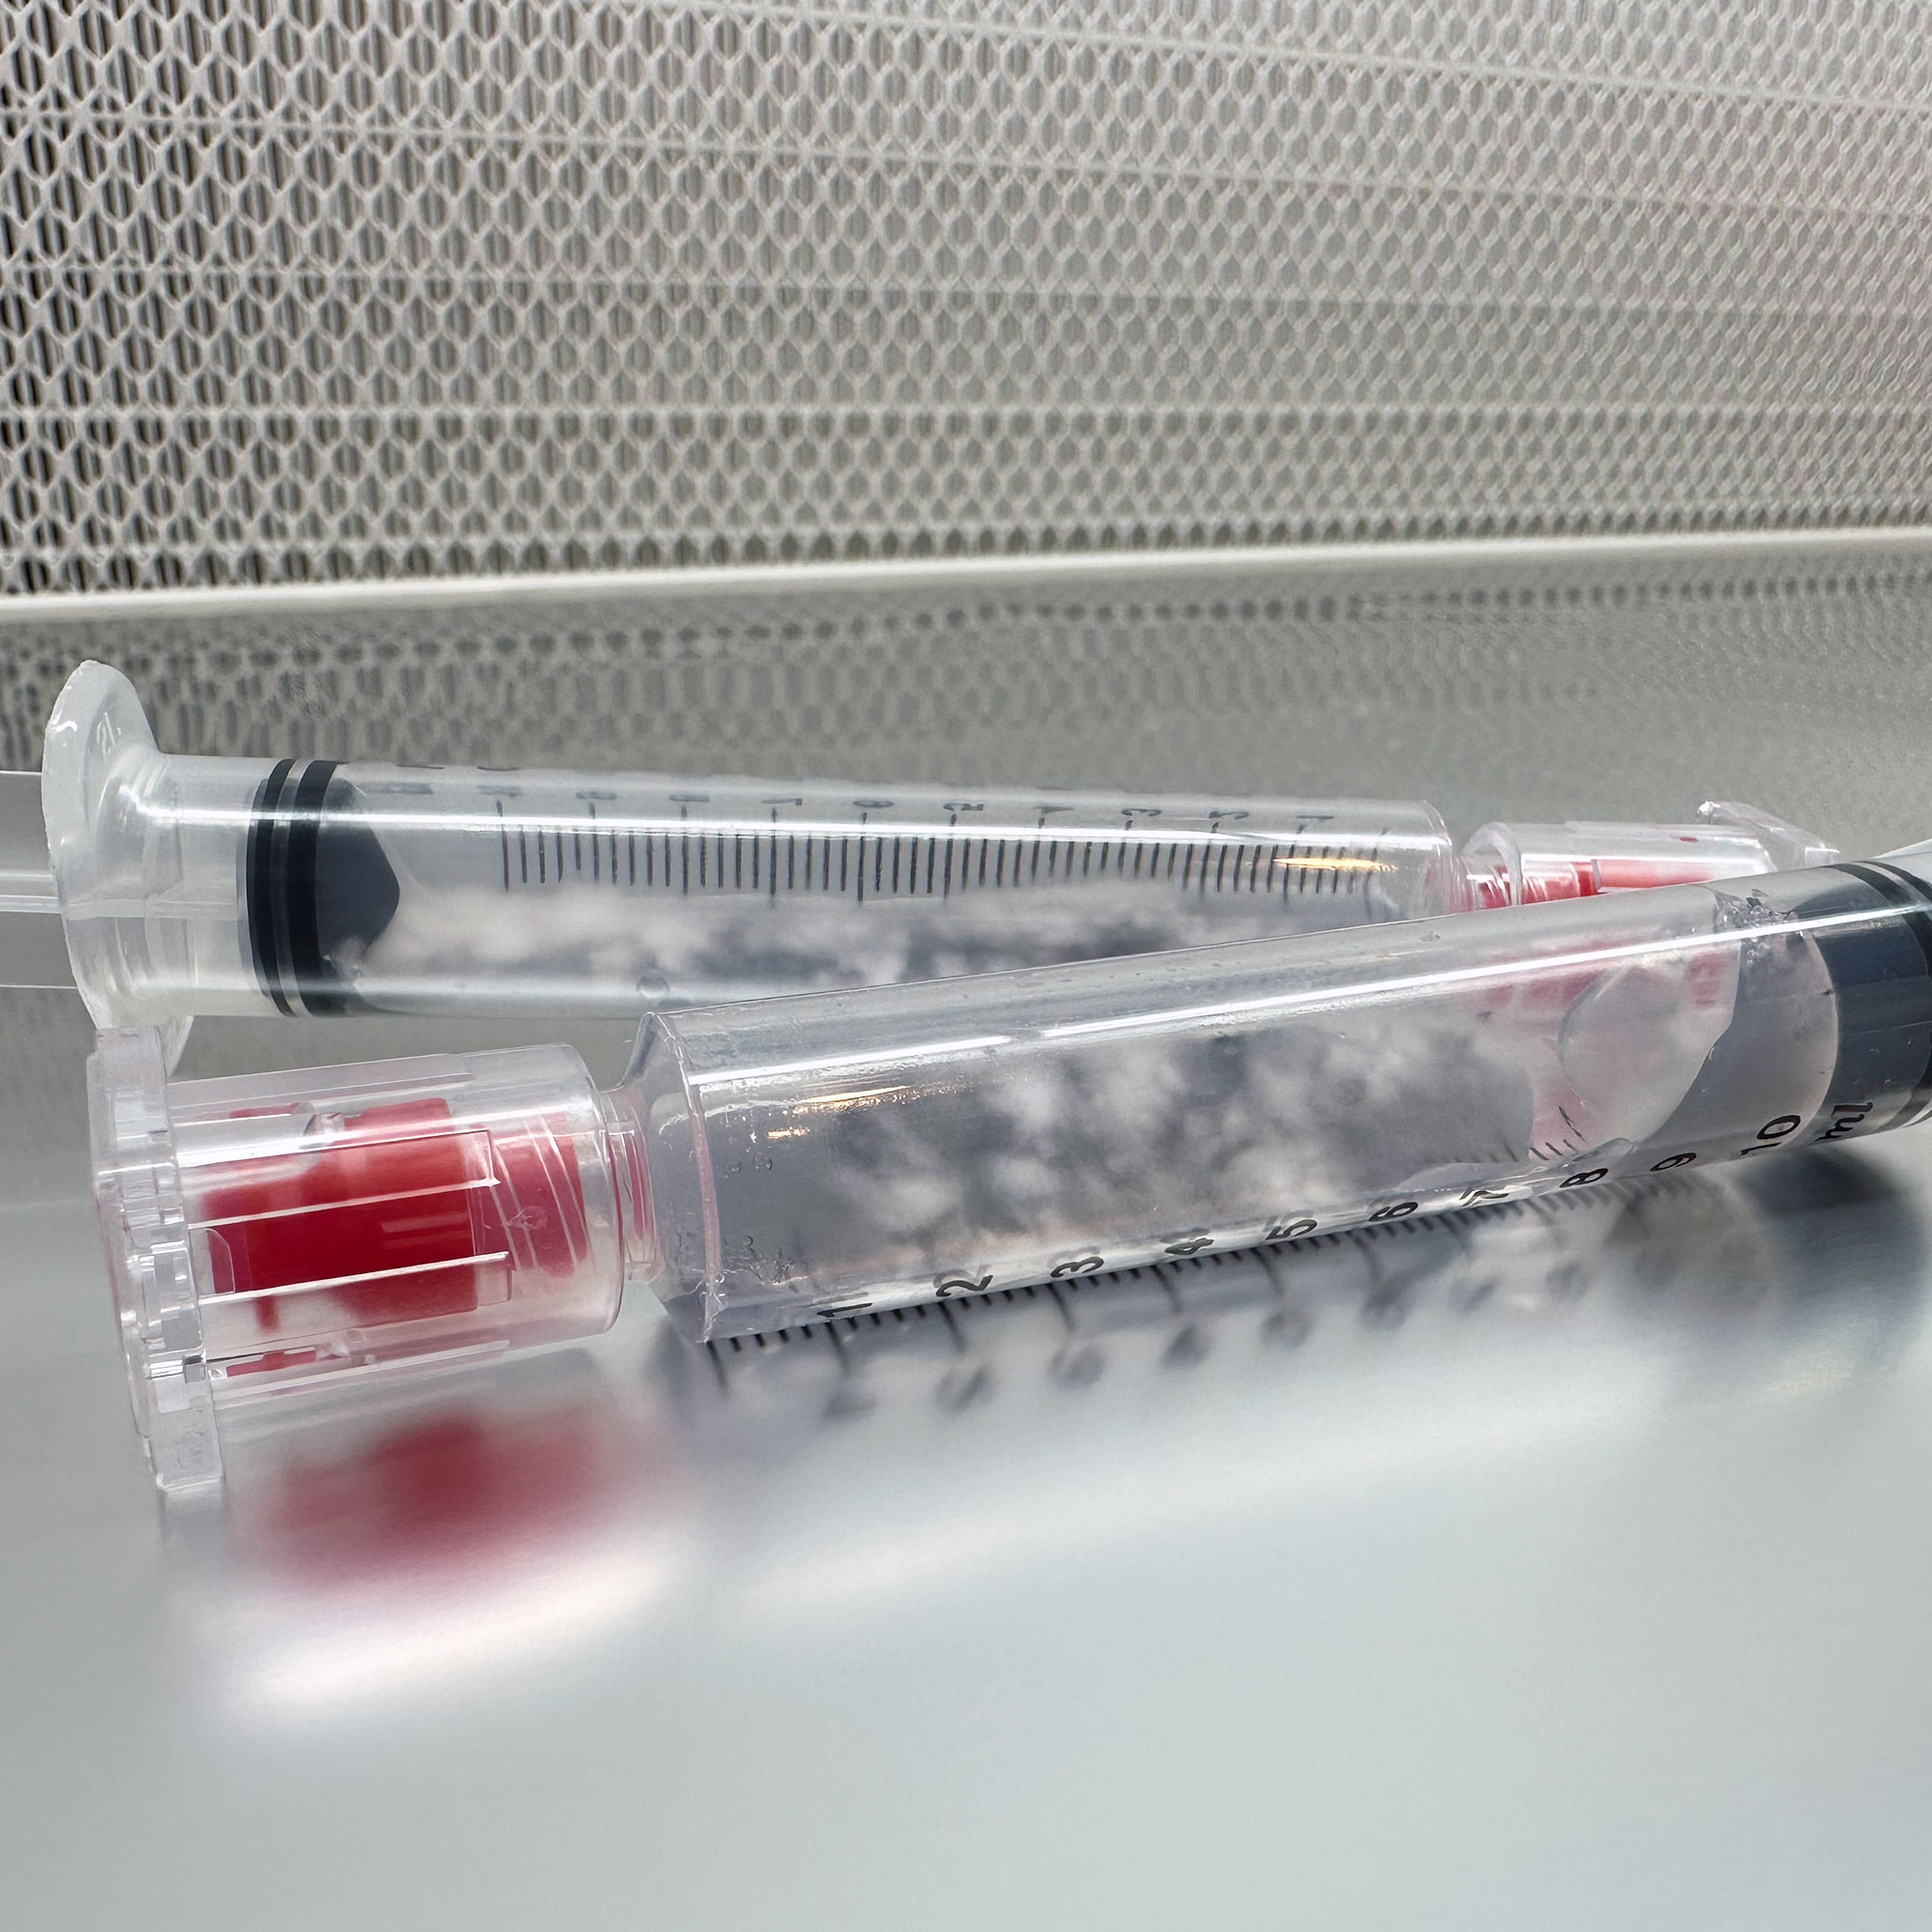
- Bonus: Attach the sterile 18G needle and use the plunger to push mycelium-covered agar through the needle to inoculate your grow kit. It may require firm pressure – that’s normal.
Agar Deluxe (four tests; two ways to prep)
Agar Deluxe may or may not come with a single, completely filled syringe of agar. If not, then 4x 12mL syringes will come pre-filled with 3ml of set agar (with headroom for growth) and immediately ready to use without needing the following instructions. But if there is a syringe completely filled with agar, then the following instructions will be necessary – it all depends on the available stocks.
Option A – Melt-and-inject (cleaner looking)
- Leave the agar-filled syringe sealed inside its zip bag and place it in gently boiling water for 10 – 15 minutes until the agar fully liquefies.
- In a SAB, attach a needle and inject ~3 ml of liquid agar into each of the 3 empty sterile syringes (keep ~3 ml for the original if making all 4).
- Extend the plungers to create headspace. Lay syringes flat; agar will set as they cool below ~45°C.
- Inoculate each agar syringe with a sterile swab as described above.
Option B – Squeeze-the-gel (fast and easy)
- Attach a needle to the agar-filled syringe and squeeze ~3 ml of the gelled agar into each empty sterile syringe.
- It will look irregular, but mycelium will happily colonise the gel.
- Inoculate with a sterile spore-covered swab as above.
Important handling notes
- White tape on grain syringes: Do not remove it. It covers a small drill hole that provides filtered air exchange.
- Needles: Agar uses 18G; grain uses 21G.
- Luer-lock: All syringes are luer-lock for secure needle/cap attachment.
Not included
- Gourmet spore syringe or spore swab/print.
- Grain: you’ll need ~0.1 ml from your own spore syringe.
- Agar: bring your own spore print or swab (included sterile swab can be used to swab your own spore prints).
Storage and shelf life
- Use within 3 months of receipt for best results.
- Store at room temperature in a cool, dry, dark place. Avoid direct sunlight, heat sources, and freezing. Keep sealed until use and keep clean after inoculation, especially if planning to use the grain variant as a G2G syringe.
Safety
- Sharps: Needles and scalpels are sharp – handle with care and dispose of them in an appropriate sharps container.
- Keep out of reach of children.
- If you see unusual growth, colours, off-odours, treat as contamination and discard safely.
Shipping and legal
- Ships from the UK to most of the world.
- Made fresh to order; dispatch aim of 3 working days (see Shipping and Dispatch page in footer for more info).
- For testing legal mushroom species only.
Why SporeKit?
- Test first, grow with confidence. Seeing clean, healthy mycelium in the syringe lets you proceed with ultimate confidence – success rates beyond what’s possible when you can’t verify a spore syringe’s cleanliness.
- Grain vs agar, made simple. Grain is optimised for liquid spore syringes; agar excels with dry spores (from spore print scrapings / swabs) – and both can become usable culture syringes.
- Deluxe = more value. Run multiple tests and convert winners into multiple culture syringes (and, for Grain Deluxe, G2G syringes for SpawnTubs and grow bags like the MycMonster).
FAQ
What’s the main difference between Grain and Agar?
Grain is optimised for liquid spore solutions. Agar is optimised for dry spores, like taking a swab of a spore print with the included sterile swab and lets you turn a clean test into a culture syringe.
Why is there white tape on grain syringes?
It covers a tiny drill hole for filtered air exchange. Don’t remove it; it’s essential for full, clean colonisation.
How many tests can I run with Agar Deluxe?
Up to four syringes total (the original plus three more you create), each of which can be inoculated and later used as a culture syringe.
Can I smell-test a colonised syringe?
Only if you won’t use it as a G2G syringe afterwards. Opening the syringe is higher risk, so can contaminate it.